Security Testing
Tomaso Vasella


Im ersten Kapitel haben wir eine Appliance für den Out of Band Remote Support konfiguriert und das System mit einem konfigurierten Mobilfunknetzmodul versehen. Es gilt nun, sicherzustellen, dass die Appliance (APU) sich automatisch mit unserem Zugangsserver (VPN) verbinden kann. Zudem sollen andere, für die Sicherheit wichtige, Features konfiguriert und feineingestellt werden. Fangen wir also mit dem VPN-Framework an.
Die Appliance soll aufstarten und sich automatisch mit dem Internet über den Anschluss wwan0 unter Nutzung des Mobilfunknetzes verbinden. Konfigurieren wir nun eine Secure Tunnel Connection. Die APU soll sich nach dem Start zuerst mit dem Internet und dann mit unserem VPN-Server verbinden. Für letzteren verwenden wir einen OpenVPN-client, den wir mit dem Befehl apt-get installieren.
root@bluebrick:~# apt-get install openvpn

Reading package lists... Done
Building dependency tree
Reading state information... Done
The following extra packages will be installed:
  easy-rsa liblzo2-2 libpkcs11-helper1 opensc opensc-pkcs11 openssl
Suggested packages:
  ca-certificates resolvconf
The following NEW packages will be installed:
  easy-rsa liblzo2-2 libpkcs11-helper1 opensc opensc-pkcs11 openssl openvpn
0 upgraded, 7 newly installed, 0 to remove and 0 not upgraded.
Need to get 2,177 kB of archives.
After this operation, 5,788 kB of additional disk space will be used.
Get:1 http://http.debian.net/debian/ jessie/main liblzo2-2 amd64 2.08-1.2 [54.6 kB]
Get:2 http://http.debian.net/debian/ jessie/main libpkcs11-helper1 amd64 1.11-2 [45.4 kB]
Get:3 http://http.debian.net/debian/ jessie/main opensc-pkcs11 amd64 0.14.0-2 [687 kB]
Get:4 http://http.debian.net/debian/ jessie/main openssl amd64 1.0.1k-3 [677 kB]
Get:5 http://http.debian.net/debian/ jessie/main easy-rsa all 2.2.2-1 [17.1 kB]
Get:6 http://http.debian.net/debian/ jessie/main openvpn amd64 2.3.4-5 [477 kB]
Get:7 http://http.debian.net/debian/ jessie/main opensc amd64 0.14.0-2 [219 kB]
Fetched 2,177 kB in 4s (435 kB/s)
Preconfiguring packages ...
Selecting previously unselected package liblzo2-2:amd64.
(Reading database ... 18953 files and directories currently installed.)
Preparing to unpack .../liblzo2-2_2.08-1.2_amd64.deb ...
Unpacking liblzo2-2:amd64 (2.08-1.2) ...
Selecting previously unselected package libpkcs11-helper1:amd64.
Preparing to unpack .../libpkcs11-helper1_1.11-2_amd64.deb ...
Unpacking libpkcs11-helper1:amd64 (1.11-2) ...
Selecting previously unselected package opensc-pkcs11:amd64.
Preparing to unpack .../opensc-pkcs11_0.14.0-2_amd64.deb ...
Unpacking opensc-pkcs11:amd64 (0.14.0-2) ...
Selecting previously unselected package openssl.
Preparing to unpack .../openssl_1.0.1k-3_amd64.deb ...
Unpacking openssl (1.0.1k-3) ...
Selecting previously unselected package openvpn.
Preparing to unpack .../openvpn_2.3.4-5_amd64.deb ...
Unpacking openvpn (2.3.4-5) ...
Selecting previously unselected package easy-rsa.
Preparing to unpack .../easy-rsa_2.2.2-1_all.deb ...
Unpacking easy-rsa (2.2.2-1) ...
Selecting previously unselected package opensc.
Preparing to unpack .../opensc_0.14.0-2_amd64.deb ...
Unpacking opensc (0.14.0-2) ...
Processing triggers for man-db (2.7.0.2-5) ...
Processing triggers for systemd (215-17) ...
Setting up liblzo2-2:amd64 (2.08-1.2) ...
Setting up libpkcs11-helper1:amd64 (1.11-2) ...
Setting up opensc-pkcs11:amd64 (0.14.0-2) ...
Setting up openssl (1.0.1k-3) ...
Setting up openvpn (2.3.4-5) ...
Restarting virtual private network daemon.:.
Setting up easy-rsa (2.2.2-1) ...
Setting up opensc (0.14.0-2) ...
Processing triggers for libc-bin (2.19-18) ...
Processing triggers for systemd (215-17) ...
Der VPN-Client ist installiert, doch jetzt müssen wir das Verbindungsprofil verwenden, was auf dem VPN-Server konfiguriert werden muss. Daher nutzen wir Sophos UTM Home Edition (früher als Astaro Security Gateway bekannt). Eine persönliche Lizenz enthält nur wenige Limitationen und ist perfekt für unseren OpenVPN-Server.
Wir gehen davon aus, dass die UTM-Firewall bereits installiert ist, deren Installation geradlinig und gut dokumentiert ist. Folgende Links können Ihnen dabei helfen:
Das Remote Access Profile des Sophos UTM wird so installiert
| Schritt | Beschreibung | Bild |
|---|---|---|
| Login UTM Admin Interface | Nach dem Login mit Ihren Administrationszugangsdaten auf https://vpn.acc.lab:4444 sollten sie das UTM9-Dashboard sehen | 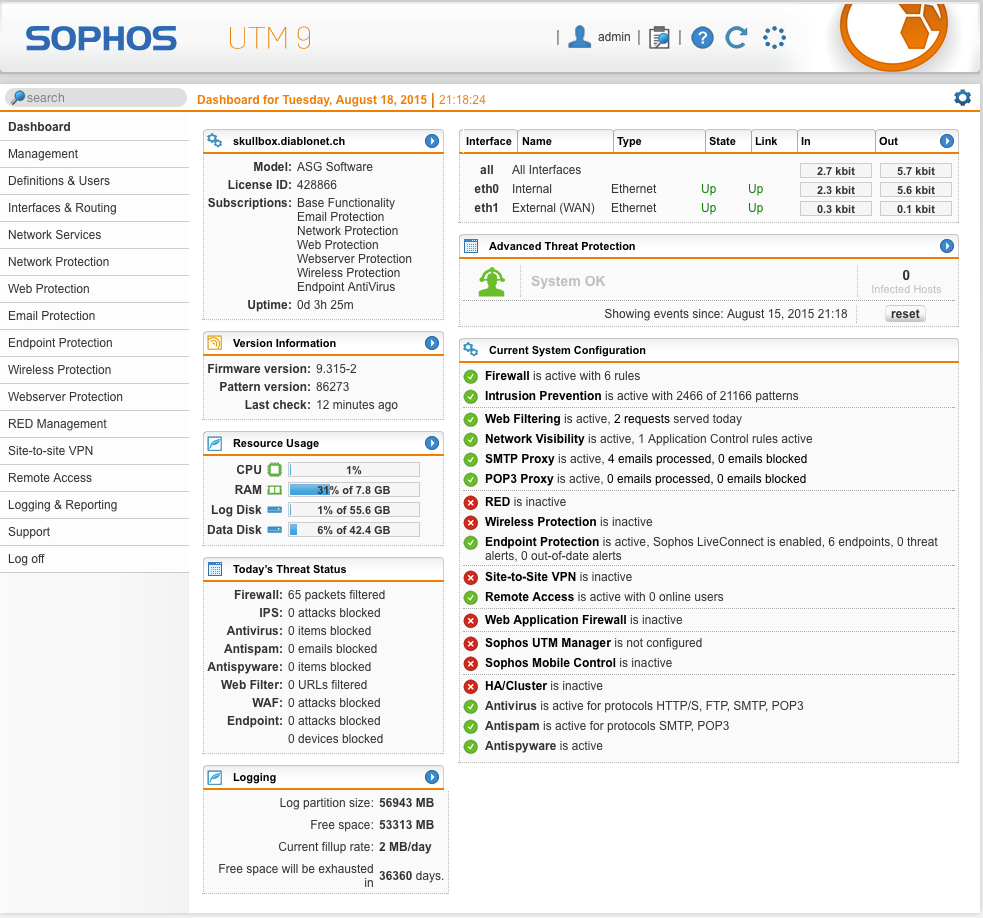 |
| Gehe zu OpenVPN-Konfiguration | Klick auf Remote Access links und wählen Sie SSL | 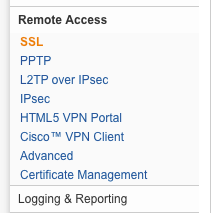 |
| Neues Profil hinzufügen | Klick auf New Remote Access Profile | 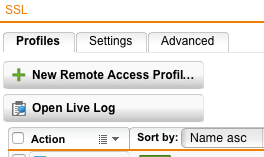 |
| Das VPN-Profil | Wir müssen nun einen Profilnamen definieren, einen user und die local networks, auf die unsere Appliance zugreifen wird | 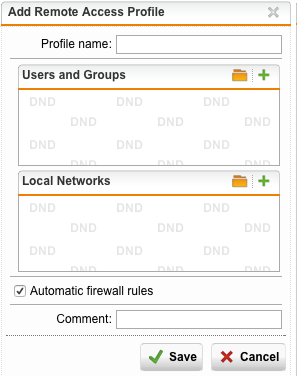 |
| Neuen User erstellen | Beim Klick auf das grüne Plussymbol im Tab users and groups können Sie Add User anwählen und das Formular ausfüllen |  |
| User-Zertifikat | Wenn Sie einen User erstellen, dann erstellt UTM automatisch ein Zertifikat, das wir in einem späteren Schritt brauchen | |
| Local Network Object erstellen | Wie oben beschrieben, erstellen wir ein Local Network Object | 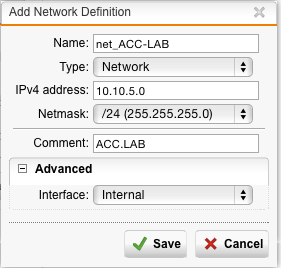 |
| VPN-Benutzerprofil bereit | So sieht ein zur Speicherung bereites Profil aus. Klicken Sie auf Save | 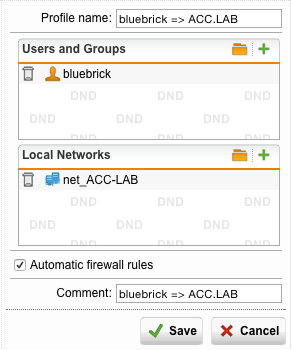 |
| VPN-Benutzerprofil aktiv | Das Profil ist erstellt, aber nicht aktiv. Klicken Sie auf den Schalter (das graue O) um es zu aktivieren. | |
| Konfiguration und Prüfung der OpenVPN-Einstellungen | Klicken Sie auf den Tab Settings um den Access Port zu überprüfen oder anzupassen (in unserem Beispiel ist das Port TCP/8000). Das Pool-Netzwerk ist das für alle OpenVPN-Clients generierte Netzwerk, von wo wir die IP nach erfolgreicher Verbindung erhalten werden (10.242.2.0/24 in unserem Fall) | 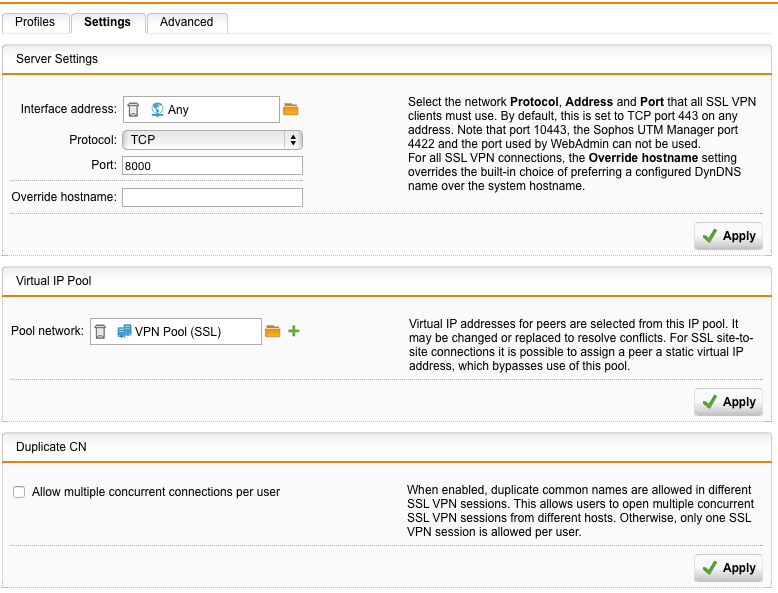 |
| Konfiguration und Prüfung der erweiterten Einstellungen | Überprüfen Sie die erweiterten Einstellungen um die Verschlüsselungsparameter zu bearbeiten – Wir nutzen die Standardeinstellungen | 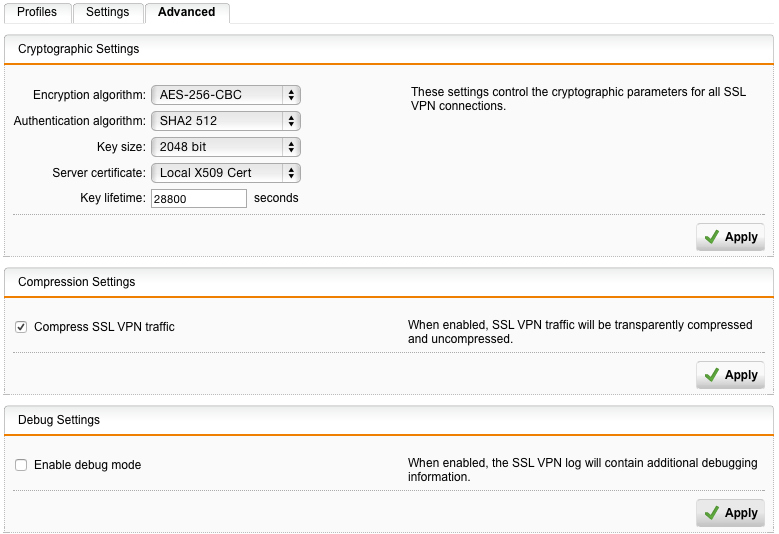 |
Jetzt müssen wir die OpenVPN-Konfigurationsdateien für unsere Appliance beziehen. Darunter fallen Zertifikate, der Private Key und die OpenVPN Konfigurationsdatei.
| Schritt | Beschreibung | Bild |
|---|---|---|
| Aktivieren des User-Portals | Stellen Sie sicher, dass das User Web Portal aktiviert ist, damit wir uns einloggen können und die VPN-Profildaten beziehen können | |
| Überprüfung des Ports auf Vorhandensein des Portals | Wählen Sie den Tab Advanced und überprüfen sie die Network Settings um sicherzustellen, dass auf das Portal zugegriffen werden kann. Wir verwenden Port 443 der von Any aus angesteuert werden kann | 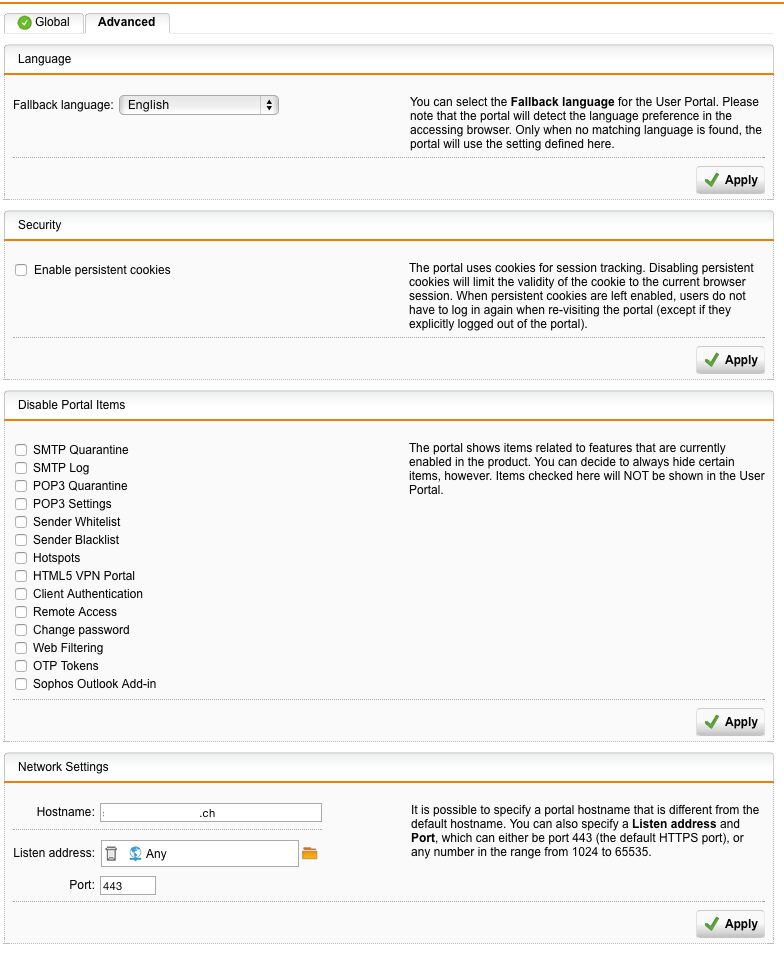 |
| Zugriff auf User-Portal | Greifen Sie mit Ihrem Browser auf das Web-Interface unter der Adresse https://vpn.acc.lab (in unserem Fall Port 443) zu. Benutzen sie die Administrator-Zugangsdaten, die Sie oben generiert haben (in unserem Fall bluebrick) | 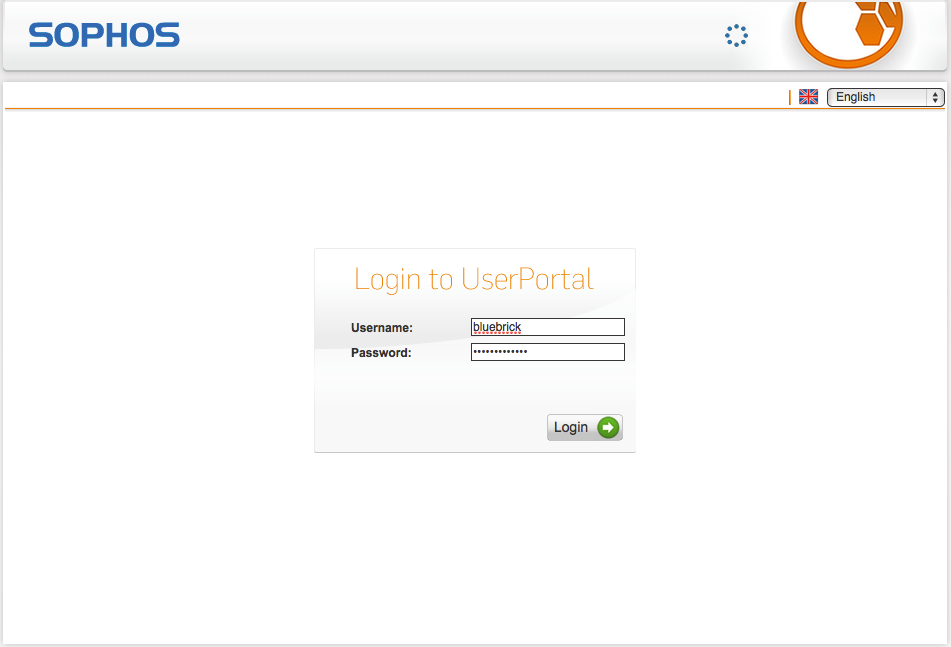 |
| Profildaten abrufen | Wählen Sie den Tab Remote Access und klicken Sie auf ZIP archive… for Linux, MacOS, BSD or Solaris. und ein komprimiertes Archiv wird heruntergeladen. | 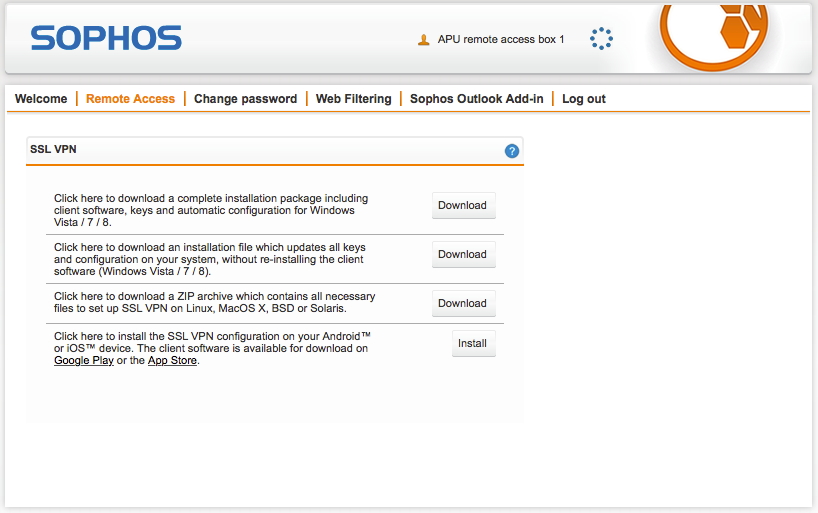 |
| Profilvorbereitung | Extrahieren Sie das Archiv. Sie werden einen Ordner mit vier Dateien ähnlich derer im Bild erhalten | 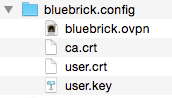 |
Die Dateien sind:
Diese Daten müssen auf den Client übertragen werden. Wir werden dazu einen USB-Stick verwenden. Der nächste Schritt: Konfiguration des OpenVPN Clients auf der Appliance.
Fahren wir fort mit der Konfiguration des Remote-Access-Profils:
root@bluebrick:/# dmesg| tail -n 20
[27734.428274] usb 1-1: new high-speed USB device number 2 using ehci-pci
[27734.566099] usb 1-1: New USB device found, idVendor=0951, idProduct=1689
[27734.566116] usb 1-1: New USB device strings: Mfr=1, Product=2, SerialNumber=3
[27734.566124] usb 1-1: Product: DataTraveler SE9
[27734.566132] usb 1-1: Manufacturer: Kingston
[27734.566139] usb 1-1: SerialNumber: 0019E06B7114BCB107E20091
[27734.567479] usb-storage 1-1:1.0: USB Mass Storage device detected
[27734.568669] scsi7 : usb-storage 1-1:1.0
[27735.651373] scsi 7:0:0:0: Direct-Access     Kingston DataTraveler SE9 PMAP PQ: 0 ANSI: 4
[27735.652878] sd 7:0:0:0: Attached scsi generic sg2 type 0
[27737.152959] sd 7:0:0:0: [sdc] 15356160 512-byte logical blocks: (7.86 GB/7.32 GiB)
[27737.153644] sd 7:0:0:0: [sdc] Write Protect is off
[27737.153657] sd 7:0:0:0: [sdc] Mode Sense: 23 00 00 00
[27737.154269] sd 7:0:0:0: [sdc] No Caching mode page found
[27737.159670] sd 7:0:0:0: [sdc] Assuming drive cache: write through
[27737.192503]  sdc: sdc1
[27737.200700] sd 7:0:0:0: [sdc] Attached SCSI removable disk

* Jetzt wissen wir welches Device wir mounten können (sdc):
root@bluebrick:~# mount /dev/sdc1 /mnt/
root@bluebrick:~#
root@bluebrick:~# df -h
Filesystem      Size  Used Avail Use% Mounted on
/dev/sda5        15G  710M   13G   6% /
udev             10M     0   10M   0% /dev
tmpfs           787M  8.5M  779M   2% /run
tmpfs           2.0G     0  2.0G   0% /dev/shm
tmpfs           5.0M     0  5.0M   0% /run/lock
tmpfs           2.0G     0  2.0G   0% /sys/fs/cgroup
/dev/sda1       114M   31M   74M  30% /boot
/dev/sdc1       7.4G  3.1G  4.3G  42% /mnt

* Kopieren Sie die Konfiguration dorthin, wo sie hingehört.
 _/etc/openvpn_:
root@bluebrick:/# cp /mnt/bluebrick.config/* /etc/openvpn/
root@bluebrick:/# ll /etc/openvpn/
total 39K
4.0K drwxr-xr-x  2 root root 4.0K Aug 19 00:50 .
4.0K drwxr-xr-x 73 root root 4.0K Aug 18 21:36 ..
4.0K -rwxr-xr-x  1 root root  625 Aug 19 00:50 bluebrick.ovpn
8.0K -rwxr-xr-x  1 root root 4.3K Aug 19 00:50 ca.crt
4.0K -rwxr-xr-x  1 root root 1.3K Dec  1  2014 update-resolv-conf
8.0K -rwxr-xr-x  1 root root 4.7K Aug 19 00:50 user.crt
4.0K -rwxr-xr-x  1 root root 1.7K Aug 19 00:50 user.key

root@bluebrick:/# umount /mnt/
root@bluebrick:/etc/openvpn# mv bluebrick.ovpn bluebrick.conf
root@bluebrick:/etc/openvpn# ll
total 39K
4.0K drwxr-xr-x  2 root root 4.0K Aug 19 00:55 .
4.0K drwxr-xr-x 73 root root 4.0K Aug 18 21:36 ..
4.0K -rwxr-xr-x  1 root root  625 Aug 19 00:50 bluebrick.conf
8.0K -rwxr-xr-x  1 root root 4.3K Aug 19 00:50 ca.crt
4.0K -rwxr-xr-x  1 root root 1.3K Dec  1  2014 update-resolv-conf
8.0K -rwxr-xr-x  1 root root 4.7K Aug 19 00:50 user.crt
4.0K -rwxr-xr-x  1 root root 1.7K Aug 19 00:50 user.key
/etc/default/openvpn
# This is the configuration file for /etc/init.d/openvpn

#
# Start only these VPNs automatically via init script.
# Allowed values are "all", "none" or space separated list of
# names of the VPNs. If empty, "all" is assumed.
# The VPN name refers to the VPN configutation file name.
# i.e. "home" would be /etc/openvpn/home.conf
#
# If you're running systemd, changing this variable will
# require running "systemctl daemon-reload" followed by
# a restart of the openvpn service (if you removed entries
# you may have to stop those manually)
#
AUTOSTART="bluebrick"
#AUTOSTART="none"
#AUTOSTART="home office"
#
dev tun
proto tcp
remote vpn.acc.lab 8000
tls-remote "C=ch, L=Zurich, O=ACC, CN=vpn.acc.lab, emailAddress=andrea@acc.lab"
route remote_host 255.255.255.255 net_gateway
resolv-retry infinite
nobind
persist-key
persist-tun
ca ca.crt
cert user.crt
key user.key
auth-user-pass
cipher AES-256-CBC
auth SHA512
comp-lzo
route-delay 4
verb 3
reneg-sec 0
auth-user-pass user.pwd
root@bluebrick:/etc/openvpn# vi user.pwd
bluebrick
password
Die Datei hat nur zwei Zeilen. Die Erste enthält den Benutzernamen – in unserem Falle Bluebrick – und die zweite das Passwort, das wir zur Erstellung des Benutzeraccounts im Sophos UTM Admininterface verwenden.
Leider muss das so gehandhabt werden, da wir beschlossen haben, dass die Appliance selbständig und ohne menschliches Zutun aufstarten soll. Daher ist es zwingend, die Zugriffsberechtigungen für kritische Dateien festzulegen.
root@bluebrick:/etc/openvpn# chmod 600 user.pwd user.key bluebrick.conf
root@bluebrick:/etc/openvpn# ll
total 40K
4.0K drwxr-xr-x  2 root root 4.0K Aug 19 01:17 .
4.0K drwxr-xr-x 73 root root 4.0K Aug 18 21:36 ..
4.0K -rw-------  1 root root  405 Aug 19 01:15 bluebrick.conf
8.0K -rwxr-xr-x  1 root root 4.3K Aug 19 00:50 ca.crt
4.0K -rwxr-xr-x  1 root root 1.3K Dec  1  2014 update-resolv-conf
8.0K -rwxr-xr-x  1 root root 4.7K Aug 19 00:50 user.crt
4.0K -rw-------  1 root root 1.7K Aug 19 00:50 user.key
4.0K -rw-------  1 root root   24 Aug 19 01:12 user.pwd
Natürlich könnten Sie eine Konfiguration vornehmen, welche die Datei verschlüsselt oder ein Passwort benötigt, aber dann müsste wieder menschliches Zutun ins Spiel kommen. Und das wollen wir nicht.
Jetzt sind wir bereit, die Konfiguration zu testen.
root@bluebrick:/etc/openvpn# openvpn bluebrick.conf
Wed Aug 19 01:20:56 2015 DEPRECATED OPTION: --tls-remote, please update your configuration
Wed Aug 19 01:20:56 2015 OpenVPN 2.3.4 x86_64-pc-linux-gnu [SSL (OpenSSL)] [LZO] [EPOLL] [PKCS11] [MH] [IPv6] built on Dec  1 2014
Wed Aug 19 01:20:56 2015 library versions: OpenSSL 1.0.1k 8 Jan 2015, LZO 2.08
Wed Aug 19 01:20:56 2015 Socket Buffers: R=[87380->131072] S=[16384->131072]
Wed Aug 19 01:20:57 2015 Attempting to establish TCP connection with [AF_INET]80.218.88.202:8000 [nonblock]
Wed Aug 19 01:20:58 2015 TCP connection established with [AF_INET]80.218.88.202:8000
Wed Aug 19 01:20:58 2015 TCPv4_CLIENT link local: [undef]
Wed Aug 19 01:20:58 2015 TCPv4_CLIENT link remote: [AF_INET]80.218.88.202:8000
Wed Aug 19 01:20:58 2015 TLS: Initial packet from [AF_INET]80.218.88.202:8000, sid=696cfd8e 72c64322
Wed Aug 19 01:20:58 2015 WARNING: this configuration may cache passwords in memory -- use the auth-nocache option to prevent this
Wed Aug 19 01:21:22 2015 VERIFY OK: depth=1, C=ch, L=Zurich, O=ACC, CN=ACC VPN CA, emailAddress=andrea@acc.lab
Wed Aug 19 01:21:22 2015 VERIFY X509NAME OK: C=ch, L=Zurich, O=ACC, CN=vpn.acc.lab, emailAddress=andrea@acc.lab
Wed Aug 19 01:21:22 2015 VERIFY OK: depth=0, C=ch, L=Zurich, O=ACC, CN=vpn.acc.lab, emailAddress=andrea@acc.lab
Wed Aug 19 01:21:27 2015 Data Channel Encrypt: Cipher 'AES-256-CBC' initialized with 256 bit key
Wed Aug 19 01:21:27 2015 Data Channel Encrypt: Using 512 bit message hash 'SHA512' for HMAC authentication
Wed Aug 19 01:21:27 2015 Data Channel Decrypt: Cipher 'AES-256-CBC' initialized with 256 bit key
Wed Aug 19 01:21:27 2015 Data Channel Decrypt: Using 512 bit message hash 'SHA512' for HMAC authentication
Wed Aug 19 01:21:27 2015 Control Channel: TLSv1, cipher TLSv1/SSLv3 DHE-RSA-AES256-SHA, 2048 bit RSA
Wed Aug 19 01:21:27 2015 [vpn.acc.lab] Peer Connection Initiated with [AF_INET]80.218.88.202:8000
Wed Aug 19 01:21:29 2015 SENT CONTROL [vpn.acc.lab]: 'PUSH_REQUEST' (status=1)
Wed Aug 19 01:21:34 2015 SENT CONTROL [vpn.acc.lab]: 'PUSH_REQUEST' (status=1)
Wed Aug 19 01:21:39 2015 SENT CONTROL [vpn.acc.lab]: 'PUSH_REQUEST' (status=1)
Wed Aug 19 01:21:44 2015 SENT CONTROL [vpn.acc.lab]: 'PUSH_REQUEST' (status=1)
Wed Aug 19 01:21:49 2015 SENT CONTROL [vpn.acc.lab]: 'PUSH_REQUEST' (status=1)
Wed Aug 19 01:21:50 2015 PUSH: Received control message: 'PUSH_REPLY,route 10.242.2.1,topology net30,ping 10,ping-restart 120,route 10.10.5.0 255.255.255.0,ifconfig 10.242.2.14 10.242.2.13'
Wed Aug 19 01:21:50 2015 OPTIONS IMPORT: timers and/or timeouts modified
Wed Aug 19 01:21:50 2015 OPTIONS IMPORT: --ifconfig/up options modified
Wed Aug 19 01:21:50 2015 OPTIONS IMPORT: route options modified
Wed Aug 19 01:21:50 2015 ROUTE_GATEWAY 10.149.210.211/255.255.255.248 IFACE=wwan0 HWADDR=02:80:37:ec:02:00
Wed Aug 19 01:21:50 2015 TUN/TAP device tun0 opened
Wed Aug 19 01:21:50 2015 TUN/TAP TX queue length set to 100
Wed Aug 19 01:21:50 2015 do_ifconfig, tt->ipv6=0, tt->did_ifconfig_ipv6_setup=0
Wed Aug 19 01:21:50 2015 /sbin/ip link set dev tun0 up mtu 1500
Wed Aug 19 01:21:50 2015 /sbin/ip addr add dev tun0 local 10.242.2.14 peer 10.242.2.13
Wed Aug 19 01:21:54 2015 /sbin/ip route add 80.218.88.202/32 via 10.149.210.211
Wed Aug 19 01:21:54 2015 /sbin/ip route add 10.242.2.1/32 via 10.242.2.13
Wed Aug 19 01:21:54 2015 /sbin/ip route add 10.10.5.0/24 via 10.242.2.13
Wed Aug 19 01:21:54 2015 Initialization Sequence Completed
Sieht doch gut aus! Drücken Sie nun CTRL+C um den Tunnel und den Test zu stoppen.
^CWed Aug 19 01:23:26 2015 event_wait : Interrupted system call (code=4)
Wed Aug 19 01:23:26 2015 /sbin/ip route del 10.10.5.0/24
Wed Aug 19 01:23:26 2015 /sbin/ip route del 10.242.2.1/32
Wed Aug 19 01:23:26 2015 /sbin/ip route del 80.218.88.202/32
Wed Aug 19 01:23:26 2015 Closing TUN/TAP interface
Wed Aug 19 01:23:26 2015 /sbin/ip addr del dev tun0 local 10.242.2.14 peer 10.242.2.13
Wed Aug 19 01:23:26 2015 SIGINT[hard,] received, process exiting
Wir sind nun bereit, zu testen, ob die Appliance ohne menschliches Zutun aufstartet und sich automatisch mit unserem VPN-Server verbindet. Starten Sie die Appliance neu und warten Sie zwei bis drei Minuten bevor Sie das Interface überprüfen.
# ifconfig
...
tun0      Link encap:UNSPEC  HWaddr 00-00-00-00-00-00-00-00-00-00-00-00-00-00-00-00
          inet addr:10.242.2.14  P-t-P:10.242.2.13  Mask:255.255.255.255
          UP POINTOPOINT RUNNING NOARP MULTICAST  MTU:1500  Metric:1
          RX packets:0 errors:0 dropped:0 overruns:0 frame:0
          TX packets:0 errors:0 dropped:0 overruns:0 carrier:0
          collisions:0 txqueuelen:100
          RX bytes:0 (0.0 B)  TX bytes:0 (0.0 B)

wwan0     Link encap:Ethernet  HWaddr 02:80:37:ec:02:00
          inet addr:10.146.202.177  Bcast:10.146.202.183  Mask:255.255.255.248
          inet6 addr: fe80::80:37ff:feec:200/64 Scope:Link
          UP BROADCAST RUNNING MULTICAST  MTU:1500  Metric:1
          RX packets:3 errors:0 dropped:0 overruns:0 frame:0
          TX packets:11 errors:0 dropped:0 overruns:0 carrier:0
          collisions:0 txqueuelen:1000
          RX bytes:684 (684.0 B)  TX bytes:1674 (1.6 KiB)
Es wird ersichtlich, dass wir in tun0 eine IP (10.242.2.14) erhalten haben. Diese liegt im VPN-POOL-Bereich unserer Point-to-Point-Verbindungen. Wir können damit feststellen, dass die Konfiguration wie erwartet funktioniert. Testen wir also nun den Zugriff auf unser Netz (10.10.5.0/24 in unserem Fall).
root@bluebrick:~# ping 10.10.5.252
PING 10.10.5.252 (10.10.5.252) 56(84) bytes of data.
64 bytes from 10.10.5.252: icmp_seq=1 ttl=64 time=420 ms
64 bytes from 10.10.5.252: icmp_seq=2 ttl=64 time=380 ms
64 bytes from 10.10.5.252: icmp_seq=3 ttl=64 time=400 ms
64 bytes from 10.10.5.252: icmp_seq=4 ttl=64 time=370 ms
64 bytes from 10.10.5.252: icmp_seq=5 ttl=64 time=410 ms
64 bytes from 10.10.5.252: icmp_seq=6 ttl=64 time=530 ms
^C
--- 10.10.5.252 ping statistics ---
7 packets transmitted, 6 received, 14% packet loss, time 6001ms
rtt min/avg/max/mdev = 370.204/418.452/530.190/52.751 ms

Passt alles. Daher gehen wir zum nächsten Schritt.
Um auf die APU zugreifen zu können, müssen wir die Verbindung auf unserem VPN-Server verifizieren (Sophos UTM). Daher verbinden Sie sich mit dem Administrations-Dashboard. Unten rechts sollten Sie im Tab Current System Configuration den Punkt Remote Access is active with 1 online users sehen. Klicken Sie darauf und sie sehen Folgendes:

Da ist der Benutzername (bluebrick) und die ihm zugeteilte IP-Adresse (10.242.2.14). Verbinden wir uns mit dem SSH-Server auf der APU.
SilverSkull:~ andrea$ ssh root@10.242.2.14

The programs included with the Debian GNU/Linux system are free software;
the exact distribution terms for each program are described in the
individual files in /usr/share/doc/*/copyright.

Debian GNU/Linux comes with ABSOLUTELY NO WARRANTY, to the extent
permitted by applicable law.
Last login: Wed Aug 19 10:31:35 2015 from 10.10.5.41
root@bluebrick:~#
Der Zugriff wird gewährt. Nun können wir jederzeit auf unsere Appliance zugreifen und alle Support-Aufgaben übernehmen.
Wir müssen die Appliance auf der Netzwerkebene absichern, da wir kein Multiuser-Unterfangen betreiben. Dies machen wir mit IPtables um den Zugriff einzuschränken:
Damit dies geschehen kann müssen wir die IPv6 und IPv4 IPTables-Konfigurationsdateien bearbeiten.
root@bluebrick:~# apt-get install iptables-persistent
Reading package lists... Done
Building dependency tree
Reading state information... Done
The following extra packages will be installed:
  netfilter-persistent
The following NEW packages will be installed:
  iptables-persistent netfilter-persistent
0 upgraded, 2 newly installed, 0 to remove and 0 not upgraded.
Need to get 18.9 kB of archives.
After this operation, 147 kB of additional disk space will be used.
Do you want to continue? [Y/n]
Get:1 http://http.debian.net/debian/ jessie/main netfilter-persistent all 1.0.3 [8,036 B]
Get:2 http://http.debian.net/debian/ jessie/main iptables-persistent all 1.0.3 [10.8 kB]
Fetched 18.9 kB in 1s (18.2 kB/s)
Preconfiguring packages ...
Selecting previously unselected package netfilter-persistent.
(Reading database ... 19298 files and directories currently installed.)
Preparing to unpack .../netfilter-persistent_1.0.3_all.deb ...
Unpacking netfilter-persistent (1.0.3) ...
Selecting previously unselected package iptables-persistent.
Preparing to unpack .../iptables-persistent_1.0.3_all.deb ...
Unpacking iptables-persistent (1.0.3) ...
Processing triggers for man-db (2.7.0.2-5) ...
Processing triggers for systemd (215-17+deb8u1) ...
Setting up netfilter-persistent (1.0.3) ...
update-rc.d: warning: start and stop actions are no longer supported; falling back to defaults
Setting up iptables-persistent (1.0.3) ...
Processing triggers for systemd (215-17+deb8u1) ...
root@bluebrick:~#
Während der Installation werden Sie Folgendes gefragt:
|============================== Configuring iptables-persistent =================================|
|                                                                                                |
| Current iptables rules can be saved to the configuration file /etc/iptables/rules.v4.          |
| These rules will then be loaded automatically during system startup.                           |
|                                                                                                |
| Rules are only saved automatically during package installation.                                |
| See the manual page of iptables-save(8) for instructions on keeping the rules file up-to-date. |
|                                                                                                |
| Save current IPv4 rules?                                                                       |
|                                                                                                |
|                            <Yes>                           <No>                                |
|                                                                                                |
|================================================================================================|
Wählen Sie YES
# An example for an IPtables ruleset (IPv4)

# Default rules
*filter
:INPUT   DROP   [0:0]
:FORWARD ACCEPT [0:0]
:OUTPUT  ACCEPT [0:0]

# FW Incoming Policy
# Accept input traffic on trusted interfaces (localhost and VPN tunnel device)
-A INPUT -i lo   -j ACCEPT
-A INPUT -i tun0 -j ACCEPT

# Allow incoming data that is part of an already established session
-A INPUT -m state --state ESTABLISHED -j ACCEPT

# Allow data that is related to an existing session
-A INPUT -m state --state RELATED -j ACCEPT

# Accept responses to DNS queries
-A INPUT -p udp -m udp --dport 1024:65535 --sport 53 -j ACCEPT

# Accept responses to our pings
-A INPUT -p icmp -m icmp --icmp-type echo-reply -j ACCEPT

# Accept notifications of unreachable hosts
-A INPUT -p icmp -m icmp --icmp-type destination-unreachable -j ACCEPT

# Accept notifications to reduce sending speed
-A INPUT -p icmp -m icmp --icmp-type source-quench -j ACCEPT

# Accept notifications of lost packets
-A INPUT -p icmp -m icmp --icmp-type time-exceeded -j ACCEPT

# Accept notifications of protocol problems
-A INPUT -p icmp -m icmp --icmp-type parameter-problem -j ACCEPT

# Allow connections to SSH server from trusted sources (our internal network and localhost)
-A INPUT -s 10.10.5.0/255.255.255.0 -p tcp -m tcp --dport 22 -j ACCEPT
-A INPUT -s 127.0.0.1 -p tcp -m tcp --dport 22 -j ACCEPT

# Respond to pings
-A INPUT -p icmp -m icmp --icmp-type echo-request -j ACCEPT

COMMIT
Für IPv6 gilt der Befehl vi /etc/ip6tables:
# Example for IPtables ruleset IPv6

# Drop all (IPv6 Traffic)
*filter
:INPUT   DROP [0:0]
:FORWARD DROP [0:0]
:OUTPUT  DROP [0:0]
COMMIT
Nach einem Neustart können die jetzt aktiven Einstellungen wie folgt verifiziert werden:
root@bluebrick:~# iptables -L
Chain INPUT (policy DROP)
target     prot opt source               destination
ACCEPT     all  --  anywhere             anywhere
ACCEPT     all  --  anywhere             anywhere
ACCEPT     all  --  anywhere             anywhere             state ESTABLISHED
ACCEPT     all  --  anywhere             anywhere             state RELATED
ACCEPT     udp  --  anywhere             anywhere             udp spt:domain dpts:1024:65535
ACCEPT     icmp --  anywhere             anywhere             icmp echo-reply
ACCEPT     icmp --  anywhere             anywhere             icmp destination-unreachable
ACCEPT     icmp --  anywhere             anywhere             icmp source-quench
ACCEPT     icmp --  anywhere             anywhere             icmp time-exceeded
ACCEPT     icmp --  anywhere             anywhere             icmp parameter-problem
ACCEPT     tcp  --  10.10.5.0/24         anywhere             tcp dpt:ssh
ACCEPT     tcp  --  localhost            anywhere             tcp dpt:ssh
ACCEPT     icmp --  anywhere             anywhere             icmp echo-request

Chain FORWARD (policy ACCEPT)
target     prot opt source               destination

Chain OUTPUT (policy ACCEPT)
target     prot opt source               destination
und
root@bluebrick:~# ip6tables -L
Chain INPUT (policy DROP)
target     prot opt source               destination

Chain FORWARD (policy DROP)
target     prot opt source               destination

Chain OUTPUT (policy DROP)
target     prot opt source               destination
Die Sicherheit auf der Netzwerkebene ist fertig. Wir haben jetzt grundlegende Sicherheitskontrollen etabliert. Mehr Sicherheit ist immer möglich, aber für den Moment ist der aktuelle Stand der Sicherheit ein guter Ausgangspunkt.
root@bluebrick:~# apt-get install yasat
Reading package lists... Done
Building dependency tree
Reading state information... Done
The following NEW packages will be installed:
  yasat
0 upgraded, 1 newly installed, 0 to remove and 0 not upgraded.
Need to get 105 kB of archives.
After this operation, 719 kB of additional disk space will be used.
Get:1 http://http.debian.net/debian/ jessie/main yasat all 755-1 [105 kB]
Fetched 105 kB in 3s (27.7 kB/s)
Selecting previously unselected package yasat.
(Reading database ... 19315 files and directories currently installed.)
Preparing to unpack .../archives/yasat_755-1_all.deb ...
Unpacking yasat (755-1) ...
Processing triggers for man-db (2.7.0.2-5) ...
Setting up yasat (755-1) ...
root@bluebrick:~#
Die Hilfedatei ist hübsch und einfach:
root@bluebrick:~# yasat --help
Found /etc/yasat/yasat.conf
=====================================
== YASAT                           ==
== Yet Another Stupid Audit Tool   ==
==                                 ==
== Copyright (C) 2008-2014         ==
== LABBE Corentin                  ==
============================================================
|Available options                                         |
|                                                          |
|  --standard          (-s) Do standard test               =====
|  --list              (-l) List plugins available             |
|  --debug             (-d) print debug informations           |
|  --help              (-h) show this help                     =====
|  --html              (-H) export YASAT 's results in html        |
|                           default to ~/yasat/yasat.html          |
|  --html-output PATH       PATH is the name of html file to write |
|  --advice-lang LANG       LANG is the 2letter digit of the lang  |
|                           (default is EN )                       |
|  --full-scan         (-f) Do extra (long) tests (lots of find)   |
|  --plugins-dir PATH  (-P) Set the path to the plugins to use     |
|                           (default is ./plugins )                |
|  --nopause           (-a) Do not make a pause after plugin's end |
|  --plugin PATH       (-1) Just use the plugin pointed by PATH    |
|  --Plugin NAME       (-p) Just use the plugin named NAME         |
|  --scanroot PATH     (-r) Scan PATH instead of / (WorkInProgress)|
|  --compliance type        Check for a specific compliance.       |
|                           type could be cce, nsa or all          |
|  --print-level X          Just print infos equal or above the    |
|                           level X (All = 0 (default), infos = 1  |
|                           warnings(orange) = 2, errors(red) = 3  |
|  --skip                   Test(s) to skip, without the .test     |
|                           (ex: --skip nfs,ntp) comma separated   |
|  --check-update           Check if an update of YASAT exists     |
|  --send-support           Same as --check-support but you will   |
|                           send also your OS version as parameter |
|                                                                  |
| Thanks for using YASAT.                                          |
|                                                                  |
====================================================================
Lassen Sie es mit den standard flags (-s) laufen und überprüfen Sie den Output:
root@bluebrick:~# yasat -s
Found /etc/yasat/yasat.conf
  Using YASAT version                                              [ 755 ]
  Using YASAT with UID=0                                           [ OK ]
  Using YASAT without SELinux                                      [ OK ]
  Detecting OS...                                                  [ DONE ]
    Debian Linux Linux 3.16.0-4-amd64
  Detecting TERM width...                                          [ 137 ]
Color chart
 GREEN   is for good configuration or information
 RED     is for configuration that must be corrected
 ORANGE  is for optional configuration that can be done
 BLUE    is for information

At the end of the audit, the report will be available at /root/.yasat//yasat.report

=== Check accounting and audit configuration ===
  /var/log/wtmp                                                    [ FOUND ]
  /var/log/btmp                                                    [ FOUND ]
  /var/log/faillog                                                 [ FOUND ]
  /var/log/lastlog                                                 [ FOUND ]
  accounting is not enabled                                        [ WARNING ]  Enable the accounting with accton
  Found sha512 in pam.d                                            [ OK ]
  cracklib                                                         [ NOTFOUND ]
  /etc/shadow                                                      [ FOUND ]
  password hash method for root                                    [ SHA512 ]
  default password encryption                                      [ sha512 ]
  audit is installed by package                                    [ GOOD ]
...
Hoffentlich unterstützt Ihr Terminal Farben… ;) Ich schätze, wir sind hier fertig. Abgesehen vom Zuguterletzt-Abschnitt: Monitoring
Zuerst: Sie sollten auf Ihrer APU Logging aktivieren und so viele lokale Logs wie möglich behalten. Besser noch: Senden Sie eine verschlüsselte Kopie an einen syslog-Collector auf einer anderen Maschine. Auch ist es vernünftig, einen lokalen Monitoring Agent zu installieren, der Sie alarmiert und automatisch agiert, sollte das nötig sein. Ich empfehle Monit.
apt-get install monit
Einige Beispiele für Monit-Jobs in unserem Projekt:
Lassen wir diese Möglichkeiten also in unsere Konfiguration einfliessen – Bearbeiten Sie die Datei /etc/monit/monitrc wie folgt:
###############################################################################
## Monit control file version 20150819_110
###############################################################################

###############################################################################
## Global section
###############################################################################

set daemon 60
set logfile syslog facility log_daemon
set idfile /var/lib/monit/id
set statefile /var/lib/monit/state

set mailserver mail.domain.ch USERNAME alarm@domain.ch PASSWORD password
    with timeout 30 seconds
    using HOSTNAME bluebrick

set eventqueue
    basedir /var/lib/monit/events # base directory where events will be stored
    slots 100                     # optionally limit the queue size

set mail-format {
                from:        $HOST@domain.ch
                subject:     monit alert -- $EVENT $SERVICE
                message:     $EVENT Service $SERVICE
                Date:        $DATE
                Action:      $ACTION
                Host:        $HOST
                Description: $DESCRIPTION
                }

set alert andrea@acc.lab

set httpd port 8000 address 127.0.0.1
    allow localhost        # allow localhost to connect to the server and
    allow admin:monit      # require user 'admin' with password 'monit'

###############################################################################
## CHECK System & Services
###############################################################################
##
##=============================================================================
## Check System
check system bluebrick
   if loadavg (1min) > 4 then alert
   if loadavg (5min) > 2 then alert
   if memory usage > 85% then alert
   if swap usage > 80% then alert
   if cpu usage (user) > 85% then alert
   if cpu usage (system) > 50% then alert

##=============================================================================
## Check openSSHd
check process sshd with pidfile /var/run/sshd.pid
   start program = "/etc/init.d/ssh start"
   stop  program = "/etc/init.d/ssh stop"
   if failed host localhost port 22 with proto ssh then alert
   if failed host localhost port 22 with proto ssh then restart
   if 5 restarts with 5 cycles then timeout

##=============================================================================
## Check VPN Tunnel (OpenVPN)
check process openvpn matching openvpn
   start program = "/etc/init.d/openvpn start"
   stop program = "/etc/init.d/openvpn stop"
   if does not exist then alert
   if 5 restarts with 5 cycles then timeout

##=============================================================================
## Check filesystem
check filesystem system with path /dev/sda1
   if space usage > 80% for 5 times within 15 cycles then alert

##=============================================================================
## Check Configuration & Log Files
check file user_key path /root/openvpn/user.key
   if failed permission 600 then alert
   if failed uid root then alert
   if failed gid root then alert

check file user_credentials path /root/openvpn/user.pwd
   if failed permission 600 then alert
   if failed uid root then alert
   if failed gid root then alert

check file openvpn_config path /root/openvpn/bluebrick.conf
   if failed SHA1 checksum expect c1a0a376f19b3e7f70c26b6305c8042163818f18 then alert

##=============================================================================
## Check VPN Tunnel is up and running
check host vpn.acc.lab with address 10.242.2.1
   if failed icmp type echo count 3 with timeout 3 seconds then alert
Starten Sie den monit-Daemon neu und überprüfen Sie, ob alles funktioniert:
root@bluebrick:~# /etc/init.d/monit restart
Restarting monit (via systemctl): monit.service.
root@bluebrick:~#
root@bluebrick:~# monit summary
The Monit daemon 5.9 uptime: 0m

System 'bluebrick'                  Running
Process 'sshd'                      Running
Process 'openvpn'                   Running
Filesystem 'system'                 Accessible
File 'user_key'                     Accessible
File 'user_credentials'             Accessible
Remote Host 'vpn.acc.lab' Online with all services
root@bluebrick:~#

Die Möglichkeiten Monits sind schier unendlich! Schauen Sie sich die "Dokumentation":https://mmonit.com/monit/documentation/monit.html an. Monit alleine liefert locker genug Stoff für einen separaten Artikel... vielleicht nächstes Mal. ;)
Die APU ist ein tolles Stück Hardware und dies ist nur einer der möglichen Verwendungszwecke. Die Konfiguration für Out of Band Remote Support kann auf andere Szenarien, wie zum Beispiel für eine Remote Scan Appliance, ausgebaut werden. Aber wir haben hier nur an der Oberfläche gekratzt. Es benötigt Feineinstellung, damit die Appliance ihren spezifischen Anforderungen gerecht wird. Ich hoffe, sie hatten Spass bei unserem Projekt und ich möchte Sie hiermit ermutigen, weiter ins Thema einzutauchen. Viel Spass!
 Dieser Artikel wurde aus dem Englischen übersetzt. Das Original finden Sie hier.
Unsere Spezialisten kontaktieren Sie gern!

Tomaso Vasella

Eric Maurer

Marius Elmiger

Eric Maurer
Unsere Spezialisten kontaktieren Sie gern!