Security Testing
Tomaso Vasella

How to spot PPL manipulations in Windows
No satisfactory detection options with Windows standard and out-of-the-box tools could be identified for this process on the first go. At least process information can be queried with PowerShell Get-Process to distinguish between “normal” and PPL processes. However, in this article, it remains to be seen how reliable this is and whether better options exist.
Nonetheless, research revealed some interesting information on various topics related to Windows processes and LSASS as well as PowerShell projects and UEFI variables.
The concept (also see The Evolution of Protected Processes Part 1 and The Evolution of Protected Processes Part 2) of protected processes was initially introduced with Windows Vista so that protected contents (DRM) could only be manipulated by specific processes with a specific signature. However, using Protected Process was not a viable option for protecting other processes such as the LSASS.
With Windows 8.1, Microsoft introduced the Protected Process Light, which can be used more flexibly. PPL enhances the existing Protection Flag for processes with additional types for Protection Type and Signer. The protection type describes, for example, whether the process in question is a Protected Process or a Protected Process Light. The signer determines what type of code signing is required. The whole thing takes place in a hierarchy: only processes with the same or a higher level and the correct signature can now load drivers for the protected process, for example.
In the kernel structure of process objects, the EPROCESS structure, the following variables, to name but a few examples, are available for the Protection field from Windows 8.1 onwards.
Protection types
Signers
The list of types shows the entry for the PPL type PsProtectedTypeProtectedLight, while the list of signers shows the entry PsProtectedSignerLsa.
The signers also include a type for Antimalware PsProtectedSignerAntimalware because attackers also like to manipulate the processes of anti-malware solutions.
An entry in the registry can also be used to define the LSASS as a PPL, also see at Microsoft Docs
Configuring LSA Protection Mode
RunAsPPL = dword: 1 under HKEY_LOCAL_MACHINE\SYSTEM\CurrentControlSet\Control\Lsa setVerifying LSA Protection Mode
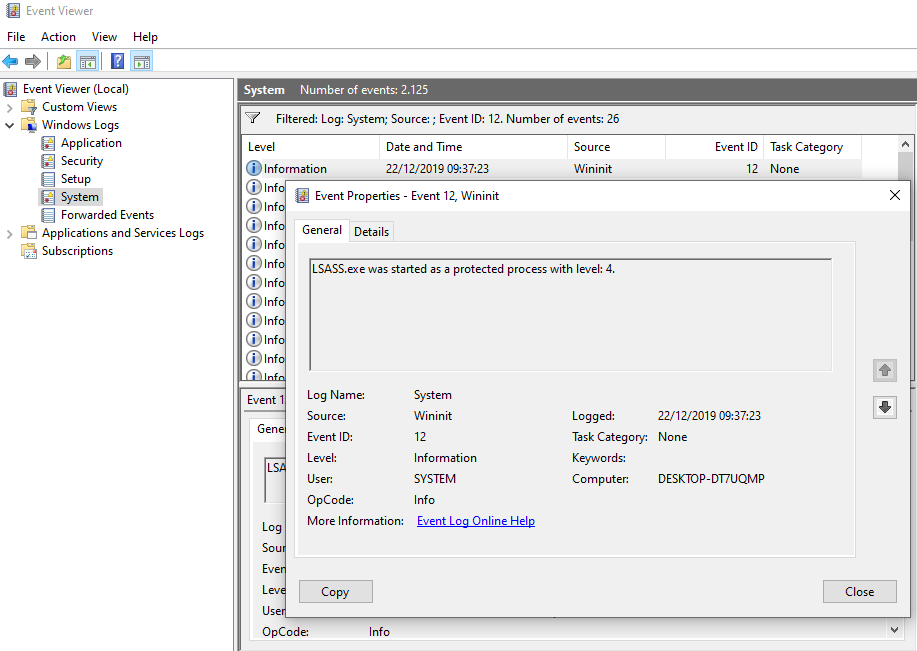
Once the registry key has been set and rebooting has taken place, verification can be performed as follows: The event with the source Wininit and event ID 12 is: LSASS.exe was started as a protected process with level: 4
You can run the Sysinternals Process Explorer in Administrator mode to track this in a graphical interface.
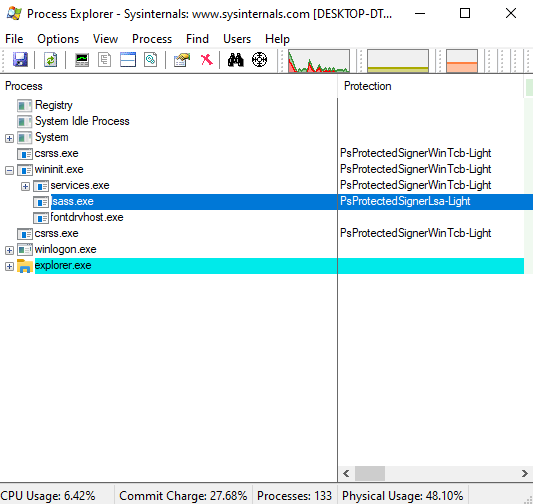
It doesn’t end with the Registry entry. To ensure the LSASS’ PPL protection cannot be removed by simply deleting the registry key, another entry is written into a UEFI variable if the system then boots from a UEFI environment.
In this way, the configuration survives reboots and even reinstallations. The fact that UEFI environment variables cannot be changed in User mode already means that the configuration is somewhat better protected. With this setup, however, the LSASS’ PPL protection can only be removed by booting UEFI application/shells.
Geeking out with UEFI is an interesting article on UEFI and Windows. In Working with UEFI variables from PowerShell, the same blog also introduces a PowerShell tool for reading UEFI variables.
With the mimidrv driver, Mimikatz now offers the option of removing PPL protection:
!+!processprotect /remove /process:LSASS.EXE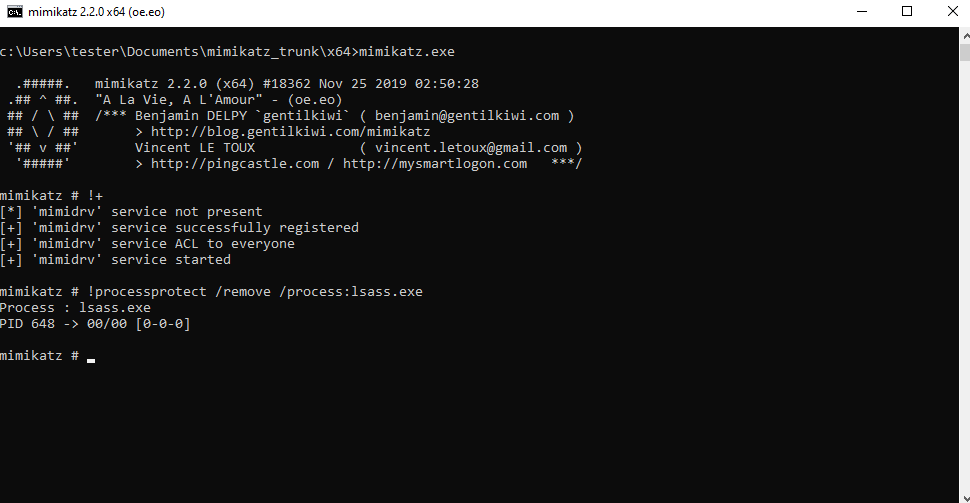
This process can be traced using the Process Explorer. To do so, Process Explorer has to be restarted; refreshing with F5 is not enough.
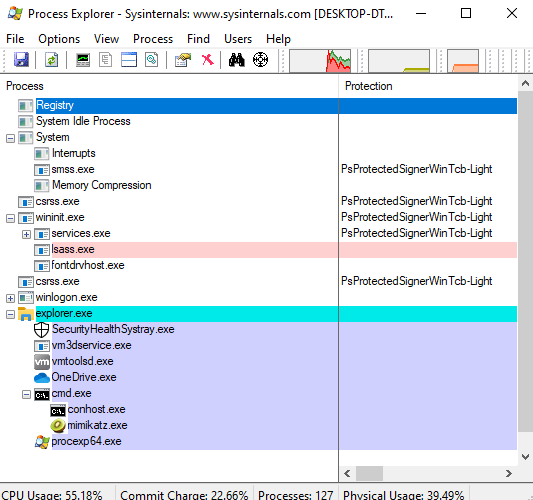
According to a tweet by Mimikatz author Gentilkiwi (Benjamin Delpy), the following command is used to manipulate the LSASS protection.
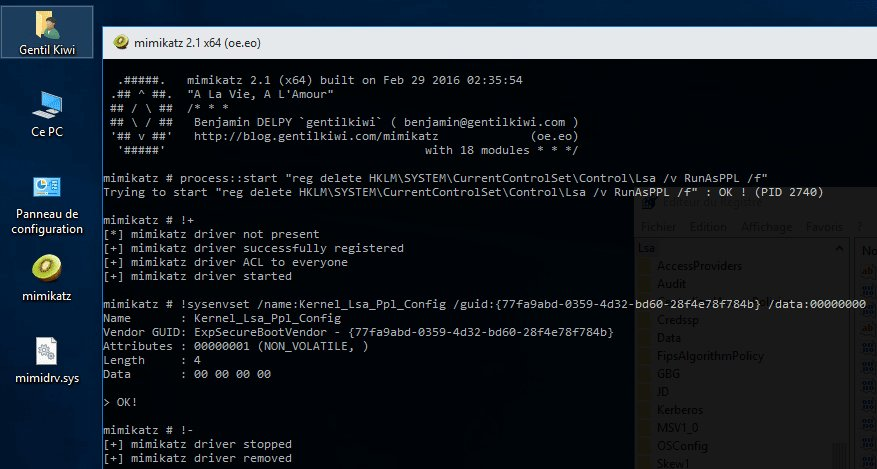
A quick glance at the Mimikatz code revealed some hints as to which Windows kernel calls Mimikatz uses to make the manipulation. The following calls seem to (potentially) play an important role here:
NtSetSystemEnvironmentValueEx in kuhl_m_kernel.cZwSetSystemEnvironmentValueEx in mimidrv.cWhile researching manipulation of PPL processes, I also noticed the PPLKiller project, which provides a tool for debugging purposes.
The other question we should ask is “Why is Mimikatz able to use mimidrv to patch the LSASS process, since this requires a valid signature that is accepted by Microsoft?” Mimikatz and mimidrv effectively have a corresponding signature.
The initial idea was to use the information acquired above to identify detection options of Windows standard tools such as Windows event/audit logs, Sysmon, etc. To do so, the following possible indicators can be summarized as the basis:
Unfortunately, I was unable to find a satisfactory solution for detecting this process within the time constraints and with Windows standard tools. So far, only one method that can check whether LSASS is still running as PPL, as a side effect, basically a poor man’s solution, has been identified.
PPL protection has the effect that certain information is not returned when process attributes are queried. Protection fields from the EPROCESS structure could not be directly read in the time available, without writing (or reusing) my own code.
However, the following PowerShell project might help here: NTObjectManager from Google Project Zero’s collection of “Sandbox Attack Surface Analysis Tools.” Another Twitter screenshot had provided the corresponding hint. Get-NTProcess a function of NTObjectManager.
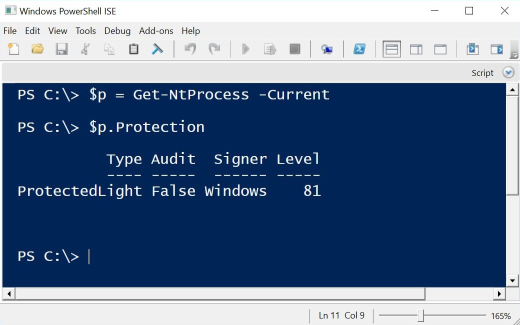
However, the Protection field could not be read here either, as it appears that permission problems have to be solved first. However, the project offers a wide range of functions that could be helpful for a number of questions.
If you compare the result of the PowerShell command Get-Process -name LSASS | Select-Object * before and after the manipulation with Mimikatz, you see that some attributes of the PPL-protected LSASS process are not returned. This could be used as a quick detection option for detecting unprotected processes (such as LSASS after Mimikatz manipulation).
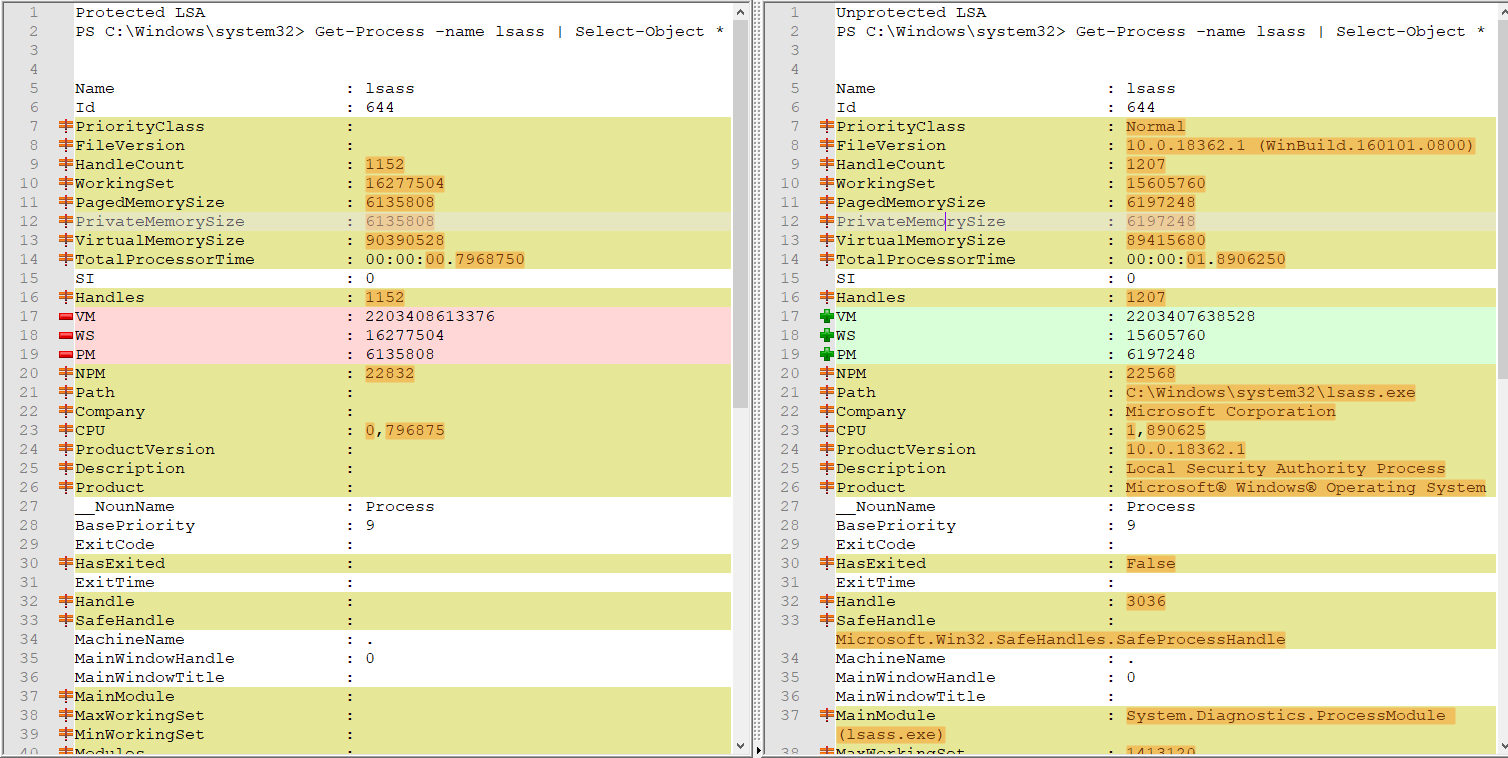
E.g. rows 20, 21, 24, 25, etc., do not show certain information in the result on the left (protected LSASS process), while this information is visible in the result on right (“normal” LSASS process).
As mentioned at the start, it is not clear whether this method is reliable. Of course, directly querying the protection variables would produce a more meaningful result. If anyone has information on how this can be done, we would be grateful if you could let us know.
We were unable to conclusively answer the question as to whether the manipulation of a process’ protection type can be detected using Windows standard tools. Since this issue is already relatively deep in the Microsoft code and takes place partially in Kernel mode, accessing the corresponding information is no trivial matter. Direct access through a distinct code, as with Mimikatz or PPLKiller, is possible, but only if the code has a corresponding signature. Of course, other options for easy detection that have not been identified in this article are absolutely conceivable.
Our experts will get in contact with you!

Tomaso Vasella

Eric Maurer

Marius Elmiger

Eric Maurer
Our experts will get in contact with you!