Specific Criticism of CVSS4
Marc Ruef

This is how you secure your Zoom meetings
Zoom is a system for video conferences, web conferences, and webinars. The simplicity and the multitude of possible uses make it particularly attractive. Especially schools rely on this solution. Many teachers and lecturers are challenged by the rapid transition to virtual teaching, which understandably can lead to neglecting a technically secure setup. If these are not specifically optimized, third parties can interfere with the meetings. This interference, often called #zoombombing, requires more attention.
The following advice refers to the desktop version of Zoom. The settings on mobile devices, e.g. on Android, deviate from this description and are sometimes difficult to find. Hosts of a meeting are advised not to use mobile devices.
After the Zoom Client has been started, meetings can be joined (Join) and scheduled (Schedule). A new meeting can be started by selecting New Meeting. However, this is not recommended for safety reasons.
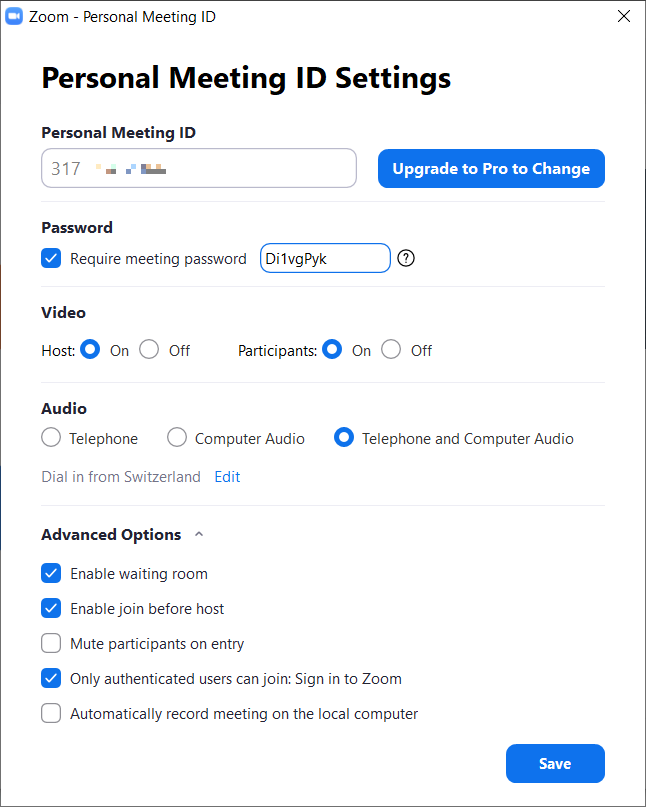
Instead, the small arrow at New Meeting can be clicked to open the context menu. In this, Use My Personal Meeting ID should be activated first, to then configure this personal room further down.
First, the option Require meeting password should be activated. If you want to enter the room, you must enter the now defined password. As usual, it is worth using a password that is as long and complex as possible to prevent guessing it.
Unfortunately, Zoom limits the possibilities. A password can have a maximum of 10 digits and cannot contain any special characters – for example, exclamation marks or commas. However, allowed are star key, at-sign, hyphen and underscore.

Also, the waiting room should be activated by selecting the Enable waiting room option. The waiting room is like a lobby, in which everyone who wants to join the meeting can enter first.
The host can then bring the participants from this waiting room into the meeting. To do this, he must select the Participants function. If unwanted participants appear in the lobby, they do not have to be admitted. If a participant has nevertheless been admitted and proves to be disturbing, he can be muted or sent back to the lobby.
Everyone can now join the meeting if they know their ID or URL and the secret password. It is not necessary to create a zoom account.
To prevent attackers from acting with little effort and with a certain degree of anonymity, Advanced Options can be opened below. There you will find the entry Only authenticated users can join: Sign in to Zoom. As soon as this is activated, a regular zoom account is required to participate in the meeting. The user must, therefore, register with a valid email address and log in with it before access.
Once the meeting has been created, these options cannot be altered. This is only possible before a meeting has been created. However, the settings can be changed as desired. The choice of password, particularly, should be adjusted regularly.
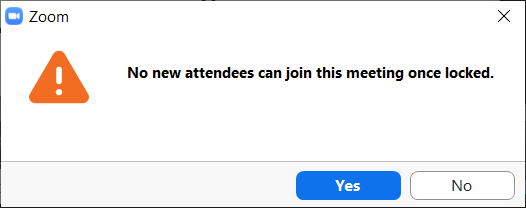
Once a meeting has been successfully established with all participants, it can be locked. At the same place where the participants are managed, click on More below to open another context menu. There is the entry Lock Meeting, with which the current constellation is permanently established. No other participants can now join the meeting. If this should still be possible temporarily, this setting must be deactivated.

When the meeting starts, the other participants can join. By default, everyone can share their screen. This can, of course, be misused, which is why it is advisable to switch off this setting.
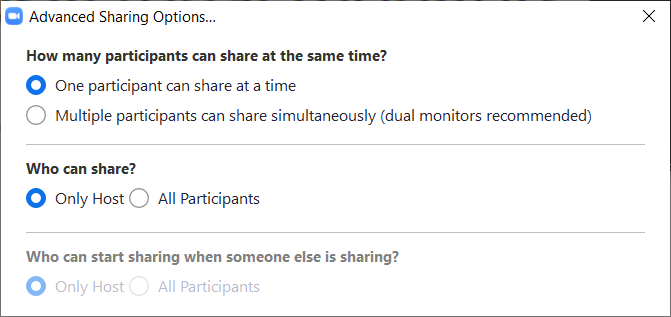
At the bottom, click on the arrow next to the icon for Share Screen to select the entry Advanced Sharing Options in the context menu. This opens a new window in which the sharing settings can be made. With Who can share? _ You should switch to _Only Host.

When screen sharing takes place, the so-called annotations can be made. All participants can mark any places with a pen and make comments. To limit the abuse here, the mouse can be moved to the top of the shared screen to display the menu. On the far right, choose More to display the context menu.
In a first step Show Names of Annotators can be activated. As a result, all scribbles are given the name of the corresponding author. Anonymous remarks no longer possible.
It is recommended, however, that the annotations be switched off for everyone. The entry Disable participants annotation can be found at the same place. If this setting is activated, only the host can add respective annotations.
Securing newly available products is not always easy when the experience is lacking. The new situation that video conferencing is used in many places is overwhelming. Zoom offers a number of setting options to make life difficult for attackers. It is a pity that these are not established by default, but must be used manually. But once understood and done correctly, you no longer have to fear that your meetings could be compromised or taken over.
Our experts will get in contact with you!

Marc Ruef

Marc Ruef

Marisa Tschopp

Marc Ruef
Our experts will get in contact with you!