You want more?
Further articles available here

Doing my job as security consultant, I’m often confronted with secure data transfers and secure data storage for whatever reason. There is always a point where you need to take confidential data with you and access it from different locations. Normally you would create some sort of an encrypted volume or container on an USB storage device. There are USB storage devices that may have a more or less obscure hardware encryption controller encrypting the data; a few even require you to physically enter a PIN code (which is nice).
Now, beside the fact that the hardware implementation is not openly documented, there is no overview on the manufacturing process either. For end-users and the risk of a master PIN code hidden within the controller becomes a real threat. So what’s the matter? Just use a known good encryption procedure and make sure to follow a good implementation process that looks like this:
If you follow those rules above, you’re on a good path. Still, there are risks when you need to access the storage on an untrusted environment – Well, how many environments do you really trust? Once the volume is decrypted all your files are accessible by the underlying system without a trustworthy access protocol. The option to mount/dismount and type every time (a probably long) passphrase, is not a very user friendly approach. Yes, I know, it really depends on the implementation of the encryption software and, most of all, on user’s attitude. But, could there be a better way of doing it?
I suppose this is the kind of question that Andrea Barisani of Inverse Path must have asked himself when he started his USB Armory project. The idea is to put a computer on an USB stick and use the (open source) operating system features to secure and access the data. This concept is valid for several usage scenarios, but let’s focus on a secure storage solution. It just happens that Andrea has also created an open-source software project named INTERLOCK that does just what we need to implement a high-secure portable storage solution. I’ll take you through the steps needed to get INTERLOCK securing your sensible data on the Armory.
First of all you need to have or get an USB Armory from the project home page. Here is how the USB Armory looks like (just the board):
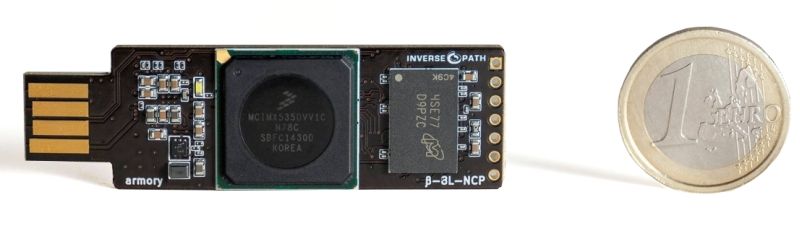
These are the hardware specifications:
| NXP i.MX53 SoC (System on Chip) Features | Hardware Security Features |
|---|---|
| ARM ® Cortex ™ A8 800-1200 MHz | High Assurance Boot (HABv4) |
| USB host powered (<500 mA) device with compact form factor (65x19x6 mm) | Authentication of initial bootloader (a.k.a. Secure Boot) |
| microSD card slot | Security Controller (SCCv2) |
| 5-pin breakout header with GPIOs and UART | Security assurance hardware module with device specific hidden secret key for AES-256 encryption/decryption and secure RAM |
| USB device emulation (CDC Ethernet, mass storage, HID, etc.) | Cryptographic accelerator (SAHARAv4 Lite) AES, DES, 3DES, RC4, C2, RSA, ECC, MD5, SHA-1, SHA-224, SHA-256 and TRNG |
| Open Hardware & Software | ARM ® TrustZone ® |
As you can see the specifications are not bad for such a small device, not bad at all! You’ll find more information about the project on the USB Armory presentation by Andrea Barisani.
And if you wonder how this is going to work, let’s put here a brief usage description. To use the Armory we need a system image on a microSD, this will be used to boot the system and start the INTERLOCK application server.
Below are the components that may be ordered by Inverse Path:
| Component | Reference | EUR |
|---|---|---|
| USB Armory board | https://inversepath.com/getusbarmory | 100.- |
| USB Armory Enclosure | https://inversepath.com/getusbarmory | 10.- |
| USB Host Adapter | https://inversepath.com/getusbarmory | 10.- |
| 32GB microSD with Debian installation | https://inversepath.com/getusbarmory | 30.- |
You’ll need the at least the board and a microSD card that should fit your storage needs.
| Step | Description | Picture |
|---|---|---|
| Prepare the microSD card | First of all, download the image file with the operating system and already installed Interlock software that you can find here. At the time of writing release 2016.06.09 was the latest one. Be sure to verify the integrity of the downloaded file with the published hash on the site:shasum -a 256 interlock-usbarmory-v2016.06.09.tgzIf the result matches, extract the files from the archive: tar zxf interlock-usbarmory-v2016.06.09.tgzGo inside the created folder and execute following command on MacOS: sudo dd if=interlock-usbarmory-v2016.06.09.raw of=/dev/diskX bs=1024And on Linux: sudo dd if=interlock-usbarmory-v2016.06.09.raw of=/dev/sdX bs=1M conv=fsyncChange __ to the accordingly to the name provided by your system. For windows user I recommend to get the get 7zip and Rufus tools to accomplish the above mentioned tasks, but other zip and imaging tools should work too. | |
| Prepare the hardware | Either you’ll use the enclosure (highly recommended) or (if you’re like me) use some sort of electrical isolating tape and it will work just fine. | 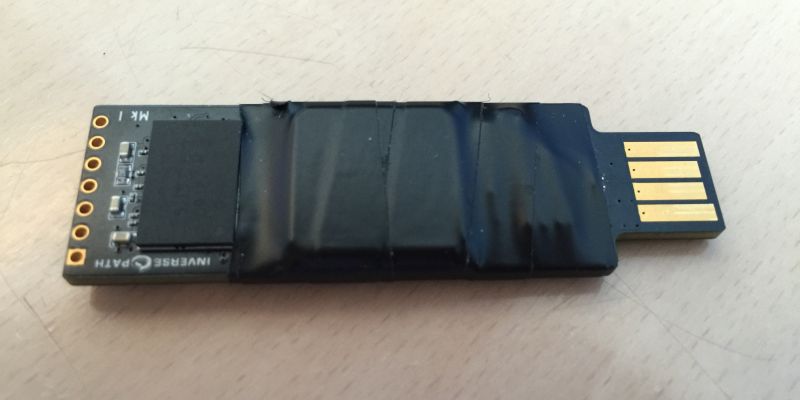 |
| Insert the previously prepared microSD | Careful not to cover the slot where the microSD will be placed (it’s not a slot instead you need to lift the small metal cover) and insert your microSD card. | 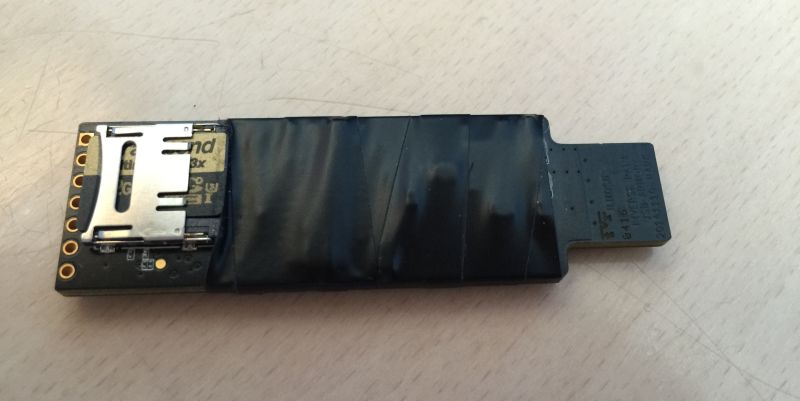 |
| Insert the USB Armory in the USB slot | The system on the chip will load the boot sector on the microSD and boot the Linux kernel. Now, keep in mind that we’ll be not accessing the system like an USB storage stick, but rather via network. | 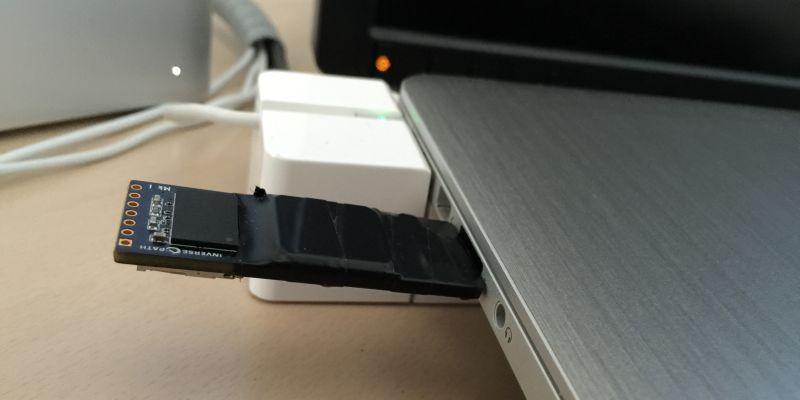 |
| USB Ethernet Emulation Mode (EEM) | First of all, the Armory will declare himself as a network adapter interface to your system using USB CDC Ethernet Emulation Model basically simulating a network over the USB bus. This is how the system protocols the events in his kernel logs:Ethernet [AppleUSBCDCECMData]:And this is the network interface configuration afterwards: en8: flags=8863<UP,BROADCAST,SMART,RUNNING,SIMPLEX,MULTICAST> mtu 1500 ether 1e:39:4f:xx:xx:xx inet6 fe80::1c39:xxff:fexx:xxxx%en8 prefixlen 64 scopeid 0×14 inet 10.0.0.2 netmask 0xffffff00 broadcast 10.0.0.255 nd6 options=1<PERFORMNUD> media. autoselect (10baseT/UTP <full-duplex>) status. active | 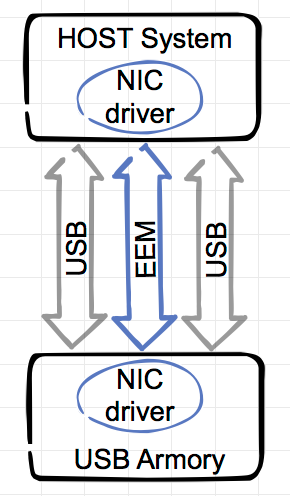 |
| Network configuration | The Armory will start a DHCP server providing the IP address 10.0.0.2 to your interface (otherwise you need to configure it manually) and this is how it looks in a simple schematic representation:[server][Armory][10.0.0.1] <---USB-EEM---> [10.0.0.2][local-system][client] | 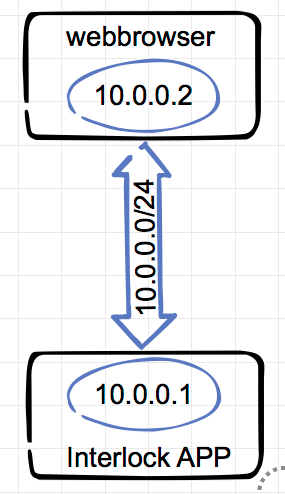 |
| System is ready | At this point we should be able to access the USB Armory via the USB EEM generated network (10.0.0.0/24) – Let’s test it with a ping to 10.0.0.1:john117$ ping 10.0.0.1The Armory system is up and running. |
So far we’ve got to know the amazing USB Armory hardware and booted with Linux. In the next part of this article we’ll get to the Interlock configuration and usage.
Our experts will get in contact with you!

Andrea Covello

Andrea Covello
Our experts will get in contact with you!