Reporting and Documenting
Michael Schneider

The Domain Name System Security Extensions (DNSSEC) is a suite of extensions that add security to the DNS protocol and is specified in the RFCs 4033, 4034 and 4035. DNSSEC adds origin authority, data integrity and authenticated denial of existence to DNS. All answers from DNSSEC protected zones are cryptographically signed. A DNS resolver can obtain the public key and validate that the responses are authentic and have not been tampered with.
Securing DNS is a crucial part in making the internet more secure. However, it is going to be years before DNSSEC is widely used. Google Public DNS supports DNSSEC since March 2013 and only 7% of the queries from the client side were DNSSEC-enabled then. 24% of all the DNS queries located in Switzerland used DNSSEC validation in the last three months according to APNIC statistics. In February 2013, SWITCH decided not to publish statistics about DNSSEC as only 0.05% of all active domains use DNSSEC. Therefore publishing any DNSSEC statistics remain unjustified. Today, only two registrars that support end user DNSSEC management including entry of DS records are listed on ICANN’s Deploying DNSSEC list for the top-level-domain (TLD) .ch. Due to this situation being far from ideal, this Labs provides an overview of DNSSEC and information about how to deploy and maintain DNSSEC. Besides, let’s be honest: How hard can it be?
DNSSEC works by digitally signing records for DNS lookup using public-key cryptography. There are two kinds of keys to sign a DNS zone: Key Signing Key (KSK) and Zone Signing Key (ZSK).
The KSK is used to sign the DNSKEY Resource Record Set (RRSet) in a zone and its public key has to be published in the Delegation signer (DS) record. This can be done by submitting the KSK public key to a registrar (and the Top-Level-Domain zone). This step is necessary to establish DNSSEC chain of trust. On the other hand a ZSK is used to sign all other RRSets on regular basis. Those keys must not be submitted to a registrar.
From a security perspective, it is recommended to keep and use zone private keys and a copy of the zone file master offline, on non-network-connected, physically secure machines only. All singing operations should run on those machines, signed zone files can be transferred to all name servers afterwards. Another security best practice is a regular change of all DNSSEC Keys. The longer a key is in use the greater the probability that it will be compromised through carelessness, accident, espionage or cryptoanalysis. A ZSK should be rolled quarterly, a KSK yearly. The Key Rollover is explained later on.
The key generation process differs, depending on the environment. In this Labs we use dnssec-keygen to create all keys. The key generation process can take a while because a server generates not enough entropy. The option -r in dnssec-keygen supports using a file containing random data, like /dev/random. Another way is using a random number generator daemon such as haveged.
In this Labs we use a domain called scip.example.com and we create a KSK with 4096 bit key size (default is 2048 bit), and a ZSK with a key size of 2048 bit (default 1024 bit). The algorithm for both keys is NSEC3-capable algorithm RSASHA256.
KSK:
# dnssec-keygen -3 -a RSASHA256 -b 4096 -n ZONE -f KSK scip.example.com
ZSK:
# dnssec-keygen -3 -a RSASHA256 -b 2048 -n ZONE scip.example.com
After running those commands, we have two files per key. One file contains the private key (.private), the other a public key (.key). Both public keys must be included in a zone file. This is done by adding the following two lines at the end of a zone file:
$INCLUDE <KSK_filename>.key
$INCLUDE <ZSK_filename>.key
Now we use those keys to sign our scip.example.com zone file. As already mentioned, the KSK signs the DNSKEY RRset, the ZSK all other records. The signature (RRSig) is valid for 30 days, afterwards a zone has to be re-signed. Otherwise a resolver can’t validate results of a request and will mark data as bogus. As a result, it’s not possible to resolve any records from this zone.
The signing process generates a NSEC record per domain name. This record lists all existing resource record types for a record and points to the next record in the zone. The last NSEC record wraps around and points to the very first record in the file. This has the side-effect that anyone can get all zone records by following the linked list of NSEC records – this technique is called Zone Walking.
For an example, we have our zone file for scip.example.com which contains two domain names.
$ORIGIN scip.example.com.
$TTL 1hscip.example.com.       IN      SOA     ns1.example.com. username.example.com. ( 2014072801 1d 2h 4w 1h )
scip.example.com.       IN      NS      ns1.example.com.
scip.example.com.       IN      NS      ns2.example.com.
scip.example.com.       IN      A       192.0.2.1
www                     IN      A       192.0.2.2
Now we sign this by using default options.
# dnssec-signzone -N INCREMENT -o scip.example.com -t scip.example.com.zone
Next we check the NSEC record for scip.example.com.: it lists all RR types (A NS SOA RRSIG NSEC DNSKEY) and points to the next record in the list (which is www). Accordingly the NSEC record for www.scip.example.com. points back to scip.example.com., thus it is the last record in the zone file.
scip.example.com.        3600    NSEC    www.scip.example.com. A NS SOA RRSIG NSEC DNSKEY
www.scip.example.com.    3600    NSEC    scip.example.com. A RRSIG NSEC
NSEC3 was released to prevent Zone Walking – or make it more difficult at least. When NSEC3 is used domain name records are hashed by using a salt value. This salt value can be specified by using dnssec-keygen and the option -3. So we use a random 16 character string as salt value and set the option -H to do 50 iterations (default is 10).
# dnssec-signzone -3 $(head -c 1024 /dev/random | sha1sum | cut -b 1-16) -H 50 -A -N INCREMENT -o scip.example.com -t scip.example.com.zone
Now all NSEC records are replaced by NSEC3 and the domain name in those records is hashed:
ILMFC5R61RDV7BLGMA4FM0K5BMJ2USGE.scip.example.com. 3600 IN NSEC3 1 1 10 BECEC0C7ED27D96A TASH4704H4T65N9E4I61B0C57EDQ9RP4 A NS SOA MX RRSIG DNSKEY NSEC3PARAM
TASH4704H4T65N9E4I61B0C57EDQ9RP4.scip.example.com. 3600 IN NSEC3 1 1 10 BECEC0C7ED27D96A ILMFC5R61RDV7BLGMA4FM0K5BMJ2USGE A RRSIG
A determined attacker can still get the salt value (query dig NSEC3PARAM <domain>), use it to build a specific rainbow table and try to break all hashed values. But this takes a long time and every time the salt value is changed, he has to start all over again. So it is a good security practice to use a different salt value every time a zone is signed.
To sum up: Key generation and zone signing can be done completely offline. The only necessary part for a name server is the signed zone file. So after we signed a zone file we transfer this file to the name server. If a KSK is used for the first time, we have to upload its public key to the registrar (DS record). All the required information for this upload is stored in a file called dsset-scip.example.com.
DNSSEC keys need to be changed on a regular base: a ZSK should be rolled quarterly (around 90 days) and a KSK yearly. The difference between a KSK and a ZSK rollover is that a KSK rollover requires interaction with the registrar.
A key rollover is not a simple remove old key, use new key replacement, because of DNS caching. DNS zone data and public keys are cached independently by DNS resolvers. The DNSSEC validation process fails if a resolver who does not have the old key cached tries to validate zone data signed by this old key or vice versa if a resolver tries to validate data that is signed by a new key against an old key in the local cache. A zone administrator has to ensure that during rollover cached data still can be verified. RFC 4641 describes two different schemes to handle a key rollover: pre-publish and double signature.
In double signature scheme, a zone is signed by two keys during rollover period. In the initial stage a zone is signed by key K1. At stage new DNSKEY key K2 is introduced into the key set and the zone is signed by K1 and K2. The rollover period has to continue until all initial stage data has expired in any resolvers’ cache. This will take at least the maximum zone TTL value at initial stage. After this period in stage DNSKEY removal K1 is removed from the key set and the zone file is only signed by K2.
Example of a double signature command:
dnssec-signzone -3 $(head -c 1024 /dev/random | sha1sum | cut -b 1-16) -H 50 -A -k KSK/Kscip.example.com.+008+61219.key -k KSK/Kscip.example.com.+008+49831.key -N INCREMENT -o scip.example.com -t scip.example.com.zone ZSK/Kscip.example.com.+008+63084.key
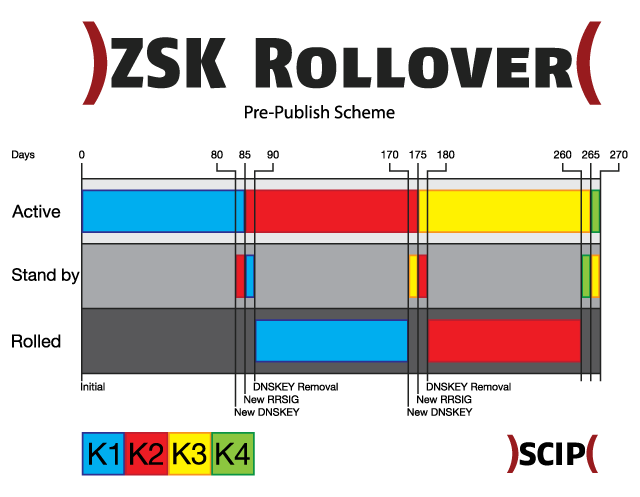
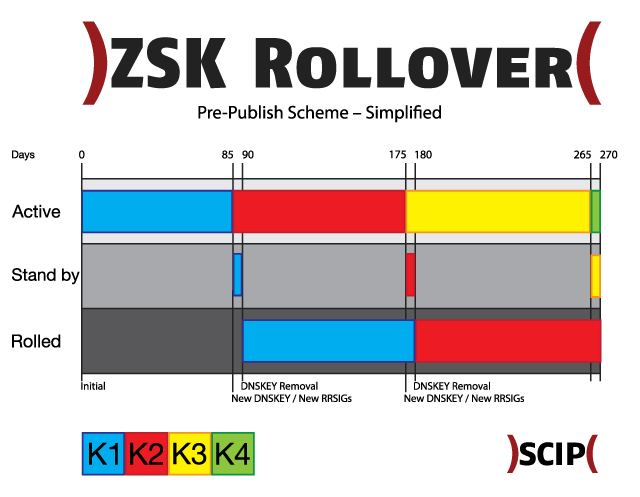
The pre-publish scheme works in four steps. In the initial stage key K1 is used to sign the zone file. At the stage new DNSKEY key K2 is introduced into the key set, but the zone is still signed by K1. The minimum duration of this pre-roll stage is the time it takes for DNS data to propagate to authoritative servers plus TTL value of the key set. At new RRSIGs stage, K2 is used to exclusively sign the zone file. K1 still remains published in the key set. Again this period has to continue until all data from the initial stage has expired in any resolvers’ cache. K1 is removed from the key set at DNSKEY removal stage. This scheme can be simplified by publishing the “future” key immediately after the rollover.
Example of a pre-publish command:
dnssec-signzone -3 $(head -c 1024 /dev/random | sha1sum | cut -b 1-16) -H 50 -A -k KSK/Kscip.example.com.+008+61219.key -N INCREMENT -o scip.example.com -t scip.example.com.zone ZSK/Kscip.example.com.+008+63084.key
The drawback of double signature scheme is that during rollover the number of signatures in a zone doubles. This could have negative effects of performance for big zones. Besides, an advantage is that it only requires three steps. The operational best practice is using double signature scheme for KSK and pre-publish for ZSK key rollover.
As an example we use the pre-publish scheme for a ZSK rollover every three months:
And when we use simplified pre-publish scheme, the future use key will be published immediately after the rollover.
A key rollover can be done manually or it’s possible to automate all steps in the process. Thus we choose to store all keys offline and do key generation and zone signing offline as well, the signed zone has to be uploaded to name servers every time.
After we know how to set up a DNSSEC secured zone, it is time to validate DNSSEC responses. The tool dig is all we need for this. Some DNS resolver like Google DNS support DNSSEC validation. If we send a request for nic.ch (A record) with DNSSEC enabled to a Google name server (dig nic.ch A +dnssec +multi @8.8.8.8), the flag Authenticated Data (AD) in the response header indicates that this request was validated. We can use dig to validate a chain of trust for a domain by using the following commands:
dig . DNSKEY | grep -Ev '^($|;)' > root.key
dig +multiline +sigchase +trusted-key=./root.key www.nic.ch. A
A DNS response contains useful information which helps us to validate a DNSSEC setup by ourselves. First we request all DNSKEY records for statdns.net by sending the query dig +dnssec +multiline statdns.net dnskey. In the answer section we find all DNSSEC keys of this zone, their Key ID and public key algorithm and of course the public key itself.
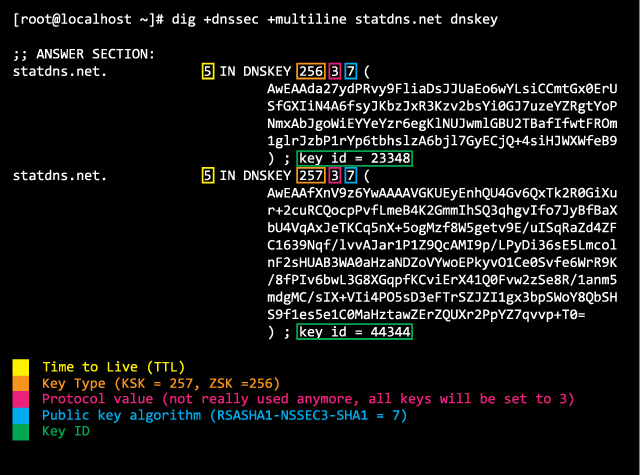
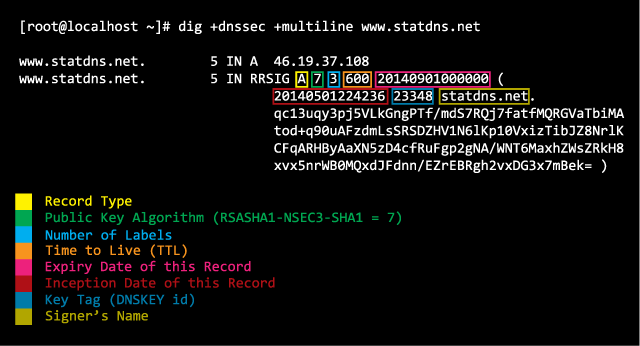
This information is used to validate a DNS record like www.statdns.net. The answer section contains a key tag which identifies the used key and information about the inception and expiry date.
Protip: If a DNSSEC resolver doesn’t show any data because the zone data is invalid (e.g. signature is expired), use the flag Checking Disabled (CD) in a DNS query (dig +cdflag ...) to get the response anyway.
Additionally there are two online DNSSEC analyzers by Verisign Labs and Sandia National Laboratories.
Our experts will get in contact with you!

Michael Schneider

Michael Schneider

Michael Schneider

Michael Schneider
Our experts will get in contact with you!