You want more?
Further articles available here


I love my MacBook… I really do. Of course this is a very personal opinion, but I like the user experience and the simplicity behind everything while still having the power of the BSD system underneath. One of nice features that unleash such power is the embedded BSM audit system. BSM stands for Basic Security Module and was created by Sun Microsystem for more information look at this labs article. By default, the BSM audit system is somehow dormant and the interaction is only via command line but don’t worry: There is an app for it!
No matter how good the security controls are configured on a system, you may want to take a closer look to whatever touches your crown jewels or be alerted by very strange behaviors happening on your system.
Data Fence is a personal security tool to monitor access to your data, alerting you when something or someone access your personal files in a suspicious way. It just cares about the access at your protected data, no matter what the software or the credentials looks like. You see, this tool leverages Apple’s built-in BSM auditing system. By the way, once you have configured BSM, the audit data can also be useful for other misuse detection and forensic analysis. Data Fence is available in the Appstore and costs only 1 USD. So it really won’t tear a hole in your wallet.
Data Fence can immediately analyze any BSM audit log file in “off-line” mode, but to monitor your own computer in real time, you need to change some system configuration settings.
Downloads > Optional live analysis tool.Once you’ve installed the live analysis tool, restart Data Fence, you’ll see in the File menu a new item named Analyze Live Data. Just select this one to start analyzing your system in real time.
Apple’s BSM audit system is installed and turned on, but with the default configuration you will see nothing. To change your configuration and make sure you are logging the needed events you have two choices:
Downloads/Audit configurations and the browser will take you there)For manual installation, edit the audit control file:
$ sudo vi /etc/security/audit_control
Change the following entries:
flags:all
minfree:10
naflags:lo,aa,pc,ex,fr,fw,fc,fd
policy:cnt,argv
filesz:512M
expire-after:60d OR 20G
Now resynchronize the audit daemon:
$ sudo audit –s
After installing, restart your machine for the audit configuration to take full effect.
Data Fence has a plenty of default rules; although most of them are inactive. You can turn on a rule by checking the Active column.

To create a new rule click the + button, and then give it a unique name.

The Data field defines the data you want to protect. The field accepts regular expressions and all files that match the pattern will be monitored.

Select what type of accesses you want to flag: reads, writes or both. Now, provide whether the data pattern should apply to only files, only directories or any file type. It is also a good practice to enable the detection of attempts to make hard links to a protected data file.
labs/images/data_fence_add_exception.png(Don’t forget to add exceptions – Click to enlarge)!
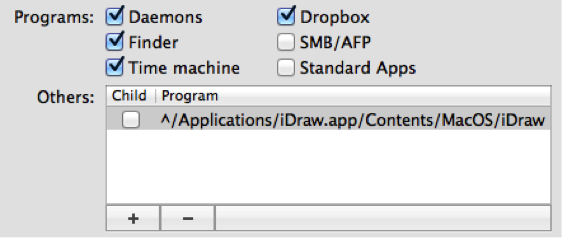
While you might want to flag every access to the protected data, it is far more common that you want to allow some programs to access the data without generating an alert. The checkboxes allow you to select a range of processes that regularly touch data, such as the daemons that index data files for Spotlight, Apple’s Time Machine backup software, etc. You can also specify specific programs that can access the data, and checking the box says any children, grandchildren, etc. of that program can also access the data.
Now you’re ready to get started, once you’ve started monitoring a BSM file or live data, click the Alerts buttons. The alerts are displayed in the left scroll view. Clicking an alert displays details about the triggered event.

File shows the file accessedProgram shows the program that triggered the eventArgs shows the arguments passed to the programThis information gives you clear evidence of what happened and are good hints on finding out if it is an anomaly or just normal operation.
labs/images/data_fence_ancestors.png(Find out where the processes come from – Click to enlarge)!
Ancestors shows the history of processes that started the offending program. The earliest process is on the top. Above you’ll see what happens when the Terminal application starts and executes the tcpdump in privileged mode (and you better know when something is sniffing your network).
labs/images/data_fence_record.png(A full audit record in Data Fence – Click to enlarge)!
Record shows the full audit record. This contains a wealth of information, often showing more information about the file path, the owner of the file, network information, etc.
This is what you’ll see when an application gets installed:
“
The GPG application gets moved inside the application folder.
And now when it gets removed:

Just removing a directory from the application folder. And this happens when an application touches important files that you defined:

In this case the backup software opened with read access the /private/etc/security meaning it took a directory listing of that folder to see if anything changed and needed to be archived.
Data Fence gives you a tool that could clearly inform and alert you on events that really matter to you. It all comes down to defining what are your crown jewels are.
On the other way you may also create a honeypot directory where only fake documents reside, like private.doc, wife.jpeg and so on, and alert if anything tries to access them, this may be a good way to hunt down malware if you’re a bit paranoid… But remember the old saying? Just because you’re paranoid doesn’t mean they’re not after you.
Our experts will get in contact with you!

Andrea Covello

Andrea Covello
Our experts will get in contact with you!