Security Testing
Tomaso Vasella


Sometimes you’re facing difficult tasks in security operation like having to secure systems that are no more in a good shape. This may have various root cause, for instance you may have:
As you may see there still are few scenarios where the normal security approach is not able to fit the requirements, and if you think there are no systems running OS/2 or Windows NT nowadays: Well, re-think – You may be surprised! ATM’s are a very good example.
Fact is that on such systems you cannot install anti-virus (because there is none or it’s not supported anymore) or simply you cannot install anything else, as it may break the systems functionality. Sometimes those systems are referred to as untouchable. Now you get the mood…
Another fact is that the threat scenario has increased quite a lot lately and we need to take in consideration that those systems may get attacked as long as they are reachable over the network.
We are not going to talk over the security architecture design and the related procedures that you need to implement in your network to lower the risks adopting communication zone concepts, security controls, security procedures and all the other good stuff in cyber security. In this case we’ll take a much more pragmatic approach that may be used as a single solution in a small environment or as a security control in a greater environment. In our test scenario we’ll take a real case that we’ve came across lately.
A close friend of mine came to me with an inquiry, he told me that he was using a POS solution that runs on a Windows XP installation. Of course he knew that Windows XP not supported for the general public anymore and many applications (including his antivirus) were end of life too. The problem was that his POS application developer went out of business and there was no option to migrate to another version of Windows and the evaluation of a new system will take too long. Another issue was that the POS system needed to be online for data exchange, email and web ordering. So he asked me if I had an idea on how to limit the risk of getting malware in the age of CryptoLocker and Co.
To summarize we have to deal with the following situation:
Therefore those would be the requirements:
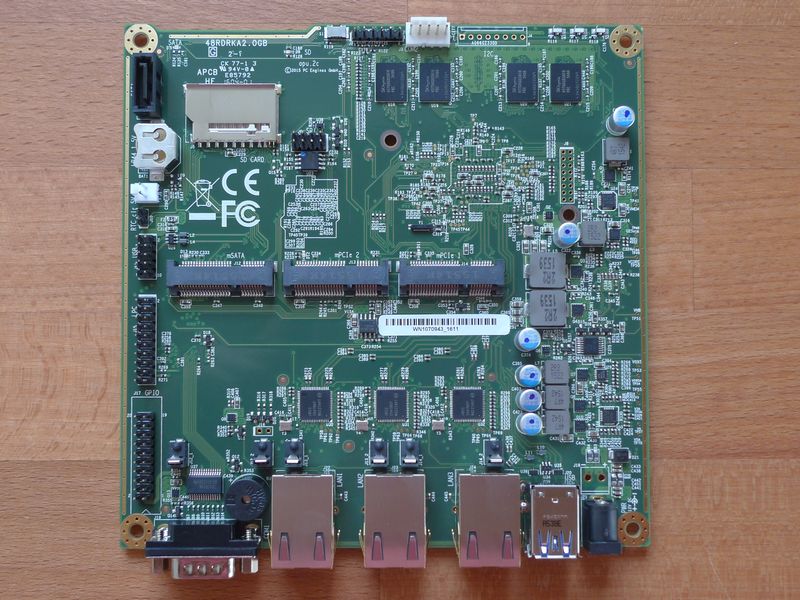
The first thing that came in my mind was to provide a solution based on an external security device that would inspect the traffic like a firewall based on the same hardware I already presented in earlier articles with the PC Engines APU hardware appliance. The newer hardware APU2 is much more powerful and able to run firewall software with inline inspection.
Unfortunately a normal firewall configuration wouldn’t work here, as I need to keep the same network design without changing IP or routing (and this may be true for several scenarios mentioned in the introduction) therefore we will need to apply a bridge or transparent firewall technique.
The same technology is used for securing network connections inside a virtual environment with products like VMware NSX Edge or Cisco NSX 1000V the firewall will inspect all communication on ISO layer 2 transparently and without changing any configuration as long as the network is connected directly to the firewall APU appliance like in the picture below.

The IP address 192.168.169.254 will be the management interface of the appliance.
To satisfy the requirements we’ll build our solution using following components:
The APU2c has following impressive specifications:
The Sophos UTM 9.4 firewall has all required features (Inline Intrusion Prevention, Application Proxies, Web Configuration) and will run just fine on the APU hardware. You’ll get a home edition online. Just follow the steps to get your license and select the Software Appliance ISO download when you’re done.
Following components are needed to build our appliance:
| Component | Reference | USD |
|---|---|---|
| Board | PC Engines apu2c4 | 130.00 |
| Storage | Kingston mSata SSD 60 equivalent (>32GB) | 40.00 |
| Enclosure | PC Engines case1d2redu | 10.00 |
| Power Supply | PC Engines US AC adapter or EU AC adapter | 5.00 |
| Total Costs | 185.00 | |
The price for the appliance is not expensive but fits most performance needs in our scenarios; you’ll find more information about the hardware in the APU2 manual (PDF).
Before we’ll start with the installation process, please take a look on the previous article on how to get ready for the serial port setup and its prerequisites, especially in the section Configure The Terminal Console Environment.
One last requirement: We need an external USB-DVD/CD reader and an USB keyboard, I know it’s a bit odd, but the UTM installation is a bit tricky and this is the only solution that will work without having to deal with a blind installation and the correlated pain.
| Step | Description | Picture |
|---|---|---|
| Prepare your workplace for serial terminal console connection | Make sure you have following setup: A laptop with an USB to Serial coverter, a null modem serial cable, an USB keyboard attached to the USB port 1 and the external USB-DVD drive on USB port 2 of the APU2. Make sure you’re using your prefered terminal software configured on your serial port (/dev/ttyS0 in my case) with following configuration: 38400,8,N,1 (further references) | 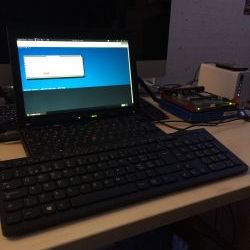 |
| Connect all cables and power on the appliance | Connect one end of the null modem cable to the serial console port and the other to the USB to Serial adapter (more references) – Remember to use the attached USB keyboard for input and use the terminal as a display only device. | 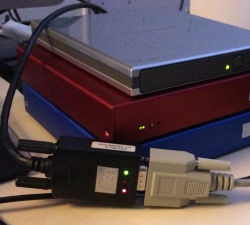 |
| Boot up the APU and follow the Sophos UTM 9.4 installation wizard | The APU2 BIOS console setting has his default speed to 115200 baud, therefore after the power-on plug, you’ll see “garbage” on the terminal screen. By default the Sophos UTM ISO boot routine sets the default Serial console speed of 38400 baud but don’t worry, after 2-3 minutes you’ll see the startup screen and the Detected Hardware | 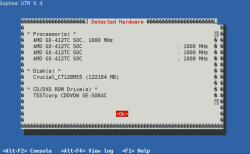 |
| Select Keyboard | Select your keyboard – In this case English (USA) | 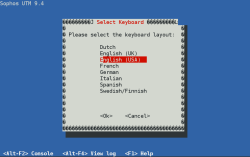 |
| Select the timezone | Select the timezone you’re in – Europe/Zurich | 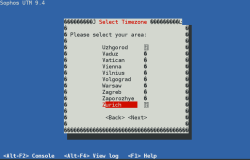 |
| Set date and time | Normally you should have the BIOS clock on UTC and correct the date accordingly to your local time zone | 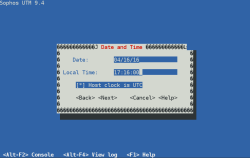 |
| Select Admin Interface | In this screen you’ll see the detected interfaces and its related links status (link) make sure you select eth0 and continue | 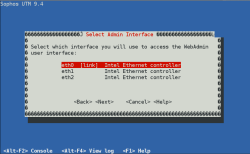 |
| Network Configuration | Now configure the administration network where we’ll connect to the WebAdmin interface – In my case I’ve selected 192.168.169.254/24 and because I’ll be connected directly, there is no need to specify a default gateway. | 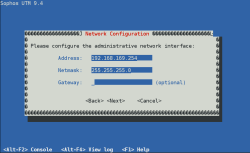 |
| 64 bit Kernel Support | Select the 64bit Kernel Support | 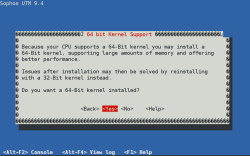 |
| Enterprise Toolkit | Select the Enterprise Toolkit |  |
| Disk Partitioning | Confirm the storage disk partitioning to continue the installation process | 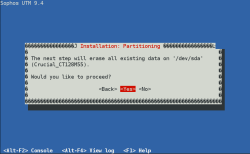 |
| Disk Formatting | Afterwards you’ll see the partitioning and formatting procedure display | 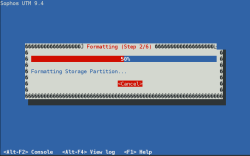 |
| Installation – Copy Packages | The installation routine will copy all required packages in the storage – this will take a while… | 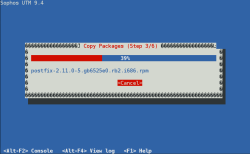 |
| Installation Finished | Once the installation routine has successfully completed, you’ll see this message with the WebAdmin coordinates to continue the Sophos UTM Appliance configuration: https://192.168.169.254:4444/ – Now select reboot | 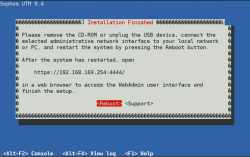 |
Now that the APU is installed with the Sophos UTM Software lets finish the configuration and apply our security policy:
| Step | Description | Picture |
|---|---|---|
| Network Connection Layout | Ensure the network cables are plugged as shown in the pictures: 1) Management (label 192.168.169.254), 2) connected to the internet (label TO NETWORK), 3) connect directly to the PC (label TO DEVICE) | 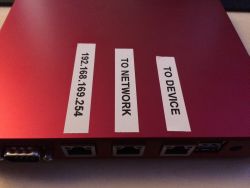 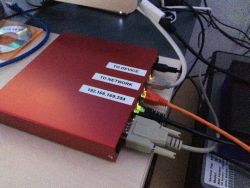 |
| Basic System Setup | Connect with your laptop to the Management interface and go to the WebAdmin interface with your preferred browser https://192.168.169.254:4444 in this case – You’ll be asked to set the appliance hostname, company information and admin credentials including the login password. Once done, you’ll be redirected to the login page of the WebAdmin (Refer also to the official documentation) | 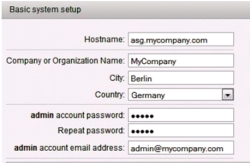 |
| WebAdmin Login | Now use the previous entered credentials to log into the WebAdmin GUI – For now the username would be admin | 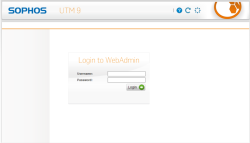 |
| Setup Wizard – Start | At this stage we could use a previous backup and restore it, but for now let’s just continue | 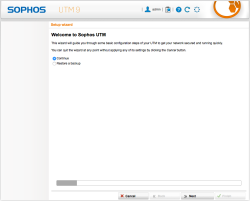 |
| Setup Wizard – License | Here you’ll apply the license you’ve received Sophos, you may continue and try the the full version for 30 days | 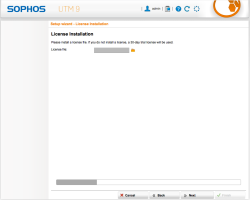 |
| Setup Wizard – Internal Network (LAN) Settings | Just confirm your management interface IP address – 192.168.169.254/24 in this case | 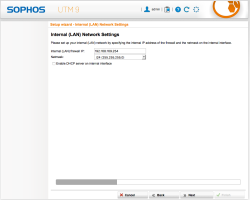 |
| Setup Wizard – Internet (WAN) Settings | We are going to make a special configuration afterwards, therefore select Setup Internet connection later | 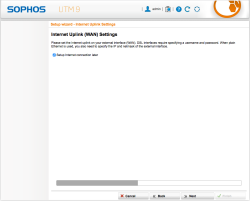 |
| Setup Wizard – Allowed Service Settings | For now just select following services to be activated: web, file transfer, Email, DNS and forwarding PING – Fine tuning will be done later | 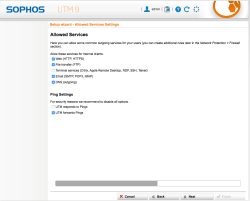 |
| Setup Wizard – ATP | Select to activate all options of the Advanced Threat Protection features | 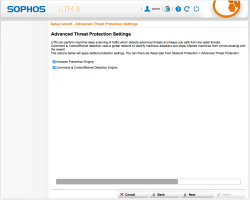 |
| Setup Wizard – Web Protection Settings | This step will create a basic Web Security Policy, we’ll dive into the details later but for now, I recommend you select following categories to be blocked: Criminal Activities, Extremistic Sites, Nudity and Suspicious – Also select Scan sites for viruses | 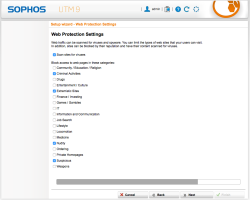 |
| Setup Wizard – Email Protection Settings | Select Scan email fetched over POP3 in case we’ll have some old fashion mail accounts emails to retrieve and inspect | 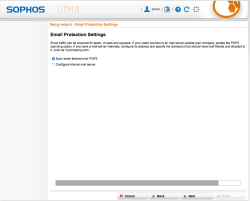 |
| Setup Wizard – Initial Configuration Done | The wizard is done and you’ll see a short report on selected option taken during the initial setup | 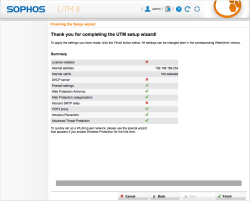 |
Now that the APU is installed with the Sophos UTM Software let’s finish the configuration and apply our security policy:
| Step | Description | Picture |
|---|---|---|
| Interfaces & Routing – Configure the Bridged Interfaces | First of all, we need to configure the interface ETH1 and ETH2 in bridge mode, therefore access the WebAdmin GUI and navigate to Interfaces & Routing and select Interfaces. | 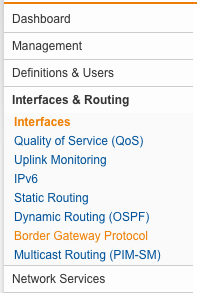 |
| Interfaces & Routing – Add a new Interface | select the button New Interface… and configure as follows: 1) define a name for the interface [Bridge br0], 2) select [Ethernet Bridge] as type and select the [eth1] and [eth2] NICs, 3) Select [Dynamic IP] to allow UTM to access the internet for pattern updates, 4) expand [Advanced Bridge] and select [Allow ARP broadcast], 5) (optional) select [Spanning Tree Protocol] if you have more machine to secure, 6) [save] the configuration |  |
| Interfaces & Routing – Interface overview | Now that the interfaces are configured, we’re ready to inspect the communication between the PC and the outside connections – If everything went good you’ll see the IP address of the bridge interface allowing the firewall to access internet for pattern updates, DNS requests and web filtering. NOTE: A configuration without internet access may also be done but you’ll miss all pattern updates for the intrusion and malware detection as also web-filtering. Still, for plain IP access control (ACL) the configuration would work as expected. | 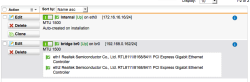 |
| Network Protection – Default Firewall Rules | During the wizard we selected some protocols to be allowed and now we’ll check the configuration and tune some options of the UTM firewall engine. Select Network Protection from the side menu on the Dashboard and click on Firewall. | 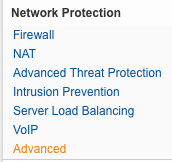 |
| Network Protection – Custom Firewall Rules | The default rules should fit you may adjust to allow other protocols as necessary. In my case, not knowing all protocol requisites of the applications running on the POS, I decided to take the monitoring approach: allowing all communication but inspecting all possible protocols with the Intrusion Detection Engine and activating the security proxies available on the UTM. | 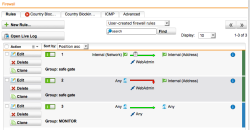 |
| Network Protection – ICMP Settings | Those are the setting for ICMP: It makes sense to allow ICMP through the firewall, application may require it. |  |
| Network Protection – Advanced Firewall Settings | For better inspection make sure you’ll select Log invalid packets. | 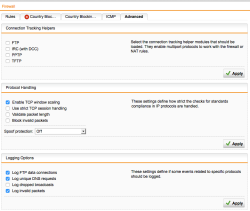 |
| Network Protection – Activate Advanced Threat Protection | Select and activate Advanced Threat Protection to recognize malware operation on local infected systems. |  |
| Network Protection – Intrusion Prevention Settings | In this scenario we take advantage of the Intrusion Detection engine to prevent attacks, and we need to activate all possible signatures. This differ from a default firewall installation and makes sense in our scenario, therefore activate all options and, because we are dealing with potentially old systems, do not set a time limit on rules age. | 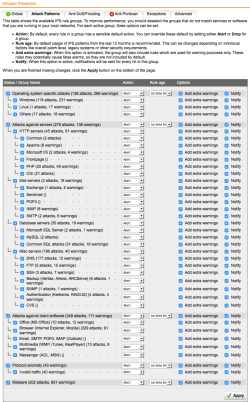 |
| Network Protection – Intrusion Prevention Advanced | Select the Advanced tab and enable [Activate file related patterns]. |  |
| Web Protection – Web Filtering Settings | Select Web Protection from the WebAdmin menu to configure the HTTP security proxy settings. This would be an unusual configuration because we added Any into the allowed networks that may access the security proxy feature. This is unusual for a standard firewall policy that’s why you’ll get the red warning message below, but in our scenario operating in Full transparent mode, this is not really an issue. | 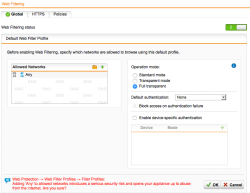 |
| Web Protection – HTTPS | At the moment the HTTPS scans features are deactivated: for a good reason. If you want to secure without interfering with the running applications that may use SSL for encrypted connection, you need to leave this feature disabled, otherwise you’ll get Certificate Mismatch errors and most likely application disruption. Truth is, that especially encrypted connection are a blind spot for any network level operating security device like this one, and it would makes sense to inspect such communications. If you cannot change anything on the securing system (because it’s qualified or “untouchable”) you have to stop here and leave HTTPS scans disabled (unless you have access the server private keys but this would out of scope here). In the case that you may add a Certificate Authority into the Certificate Store of the securing device, you may add the Sophos UTM CA public key into it. Optional: To import the UTM self generated Certificate Authority Public Key, do the following steps: 1) Select Remote Access from the side menu and click on Certificate Management, 2) find the certificate named Local X509 Cert and click on [Download], 3) select PEM as export format and click [Download], 4) import the certificate into the PC/device Trusted Root CA store. Once this is done, you’ll should be able a activate the HTTPS without incurring in HTTPS errors on the secured device. NOTE: Application that are using Certificate Pinning technology, will still generate Certificate Mismatch errors. In this case you have to disable HTTPS scanning. | 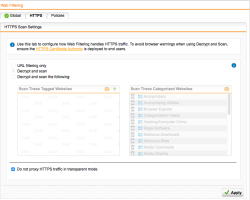 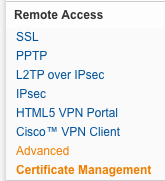 |
| Web Protection – Policy | Select the Policies tab and verify that the Base Policy is active (green). The default settings would be enough to start with; you may change settings later in case you need to allow/block additional categories or file-types | 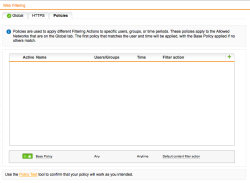 |
| Web Protection – Test Rule | We highly recommended a test rule in your policy to make easily test if the security proxy policy is working as expected. For this task follow those steps: 1) Click on Default content filter block action link in the policies tab, 2) select the Websites tab and on Block These Websites click on the green +, 3) now fill the form and add a domain to block into the Domains field [test.com] |  |
| Web Protection – Test Rule Check | After saving the rule you should be able to test it on the securing device’s web-browser and get this kind of message. | 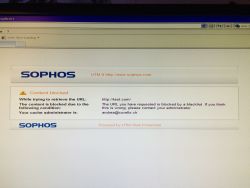 |
| Web Protection – FTP | Select the FTP menu ensure that the FTP Security Proxy is active, add Any Networks (confirm the alert about Any) and select Transparent as Operation mode. |  |
| Web Protection – Application Control | Activate the Network Visibility feature in the Application Control menu. This will allow us to recognize the different applications running on the HTTP/HTTPS protocols and better filter, monitor or prioritize the traffic with Quality of Service (QoS) policies. |  |
| Email Protection – SMTP Settings | Now let’s make sure that the email protocols are being inspected as required. Select the Email Protection section from the WebAdmin menu and select the the Global tab and make sure the proxy Status is ON (green) and the configuration is Simple Mode. Now select the Malware tab and select Dual Scan (yeah, we better don’t mess with email security these days…) Optional: We recommended to Quarantine unscannable and encrypted content too unless you have other application requirements. | 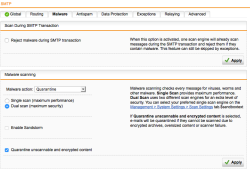 |
| Email Protection – SMTP Advanced Settings | Select the Advanced tab to activate the Transparent mode otherwise no inspection may be possible. | |
| Email Protection – POP3 Settings | Now select the POP3 menu and make sure the POP3 security proxy is active and add Any in the allowed networks (confirm the alert about Any). As final step select Dual scan in the Malware settings. | !/labs/images/20160512_pop3-proxy_general.png!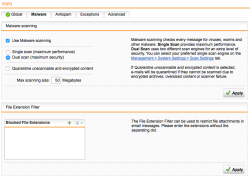 |
| WebAdmin Dashboard Config Review | Finally, select the Dashboard to get a configuration overview and verify that all security services are active (and get useful information on the actual APU/UTM appliance status). | 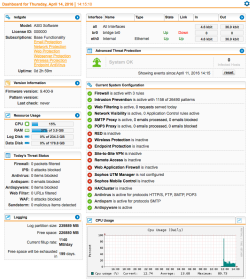 |
| Step | Description | Picture |
|---|---|---|
| Dashboard Monitoring – Application Control Overview | On the Dashboard in the upper right you’ll see statistics of the network traffic per each interface, you can click on the IN/OUT values and get following detailed application usage overview. In our case I’ve selected the bridge interface br0 and got statistics on the actual protocol/application usage (IMAP, mDNS, HTTP & unclassified). You may also select actions related to the traffic like: BLOCK, Shape or Throttle. The last 2 options are for QoS policies and may allow you to define (for example) a maximum bandwidth usage for specific application like Youtube or Facebook and guarantee a better performance for business application like email or Salesforce. | 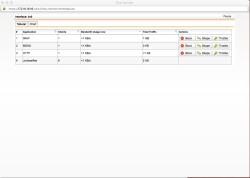 |
| Dashboard Monitoring – Application Control Graphs | The same information may be shown as a graphic that better shows the amount of usage and relation between the application/protocols used. | 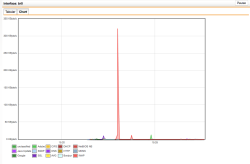 |
| Dashboard Monitoring – Application Details | If you click on the protocol, you’ll get detailed information on the sessions. In this case the application Java Update is connection to the server 104.74.88.59 on port TCP/443 (HTTPS). – Very useful information when your digging to find out what communication is established. |  |
| Dashboard Monitoring – Application Details | …and if you just wondering what the unclassified group is, take a look on this: Multicast and broadcast, but what is this unknown SSL connection on 193.85.216.233? Not sure if this connection is really needed, I guess we have further digging to do… | 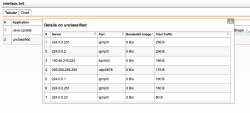 |
| Dashboard Monitoring – Network Statistics | When you click on the Network Protection menu, you’ll get following graphical statistics. The same statistics are available for web access traffic when you’ll select the Web Protection and for email traffic when you’ll select the Email Protection menu. Again, useful information about the established connections. |  |
| Dashboard Monitoring – IPS Statistics | The same is true for Intrusion Prevention Statistics, you’ll need to select Logging & Reporting section and the Network Protection menu and finally the IPS tab, select your queries and get the results as shown here. | 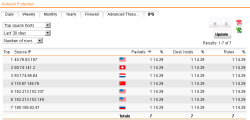 |
| Dashboard Monitoring – APT Alerting | As a short reference here is how the Advanced Threat Protection would alert you in the dashboard on Botnet traffic detection… | 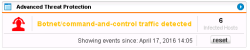 |
| Dashboard Monitoring – APT Alerting Details | …and its related detailed information. If this happen you probably will have to do some heavy digging to resolve the matter… | 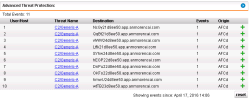 |
| Logging & Reporting | A lot of reporting, statistic and raw log-file information are available here. You just need to take some time to dig it out and make yourself comfortable with all possible information gathering that Sophos UTM is able to report for basic Security Analytics. | 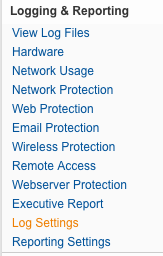 |
| Sophos UTM & More… | Sophos UTM has a huge amount of feature that we just cannot cover in this article, although this is a specific configuration example for a specific scenario, we just scratched the surface of the possibilities of the Sophos UTM features. More information is available in the online manual or on the Sophos UTM Knowledge Base – Also check the official Videos on Youtube |
The simple solution proposed in this article can be applied on several scenarios where more devices are involved instead of securing a single PC and will greatly improve the security level of the installation. The APU appliance has enough power to handle several connections at once.
The issue to secure devices that are untouchable or no more supported is a clear and present danger and most likely not be solved in the short term. A security strategy to handle this risk should be developed from the simple one PC device to the framework of industrial controllers out there having network access.
Our experts will get in contact with you!

Tomaso Vasella

Eric Maurer

Marius Elmiger

Eric Maurer
Our experts will get in contact with you!