You want more?
Further articles available here

This is how the Flipper Zero WiFi Devboard works
The firmware is the operating system of the Flipper Zero and usually also contains various apps. In addition to the official version, there are now quite a few alternatives with various additional functions and customizations. There are many resources on these topics on Github. One of the most useful collections is awesome-flipperzero.
An overview of the most common firmware variants is summarized in the following table.
| Name | Description | Link |
|---|---|---|
| Official | Source code of the official Flipper Zero firmware | https://github.com/flipperdevices/flipperzero-firmware |
| Unleashed | Firmware with support for rolling codes, community plugins and other additions | https://github.com/DarkFlippers/unleashed-firmware |
| RogueMaster | Fork of the Unleashed firmware with custom graphics, experimental customizations, plugins and games | https://github.com/RogueMaster/flipperzero-firmware-wPlugins |
| Xtreme | Fork of the official firmware with cleaned up code, more extensions and custom assets | https://github.com/ClaraCrazy/Flipper-Xtreme |
| Xvirus | Fork of the Unleashed firmware | https://github.com/DXVVAY/xvirus-firmware |
| SquachWare | Fork of the official firmware with custom graphics and applications from the community | https://github.com/skizzophrenic/SquachWare-CFW |
| Haisenteck | Fork of the official firmware with various adjustments, e.g. in the SubGhz area | https://github.com/haisenteck/flipperzero-Haisenteck |
| Korai | Fork of the official firmware with complete BLE stack | https://github.com/Korai-Labs/Korai |
There are various methods for updating the firmware:
Flipper Zero firmware normally consists of various components: Radio Stack, Hardware Abstraction Layer (HAL), Operating System (OS), Driver and Applications.
Most firmware distributions include the Firmware Build Tool fbt, which comes from the original firmware and is essentially a wrapper for SCons. This tool is very useful because it can obtain a ready-made toolchain directly from the Internet and allows you to compile and install the Flipper firmware with a simple command. Using the Xtreme firmware as an example, it is shown below how this firmware is compiled and installed on a Flipper Zero.
First clone the git repository, which is currently approx. 670 MB in size:
$ git clone https://github.com/Flipper-XFW/Xtreme-Firmware.git
Linux recognizes a Flipper Zero connected to the USB port as a Virtual Serial USB Device under /dev/ttyACM0 (the number can also be larger), for which the kernel module cdc_acm is responsible.
With the help of fbt, the compilation and subsequent installation of the generated firmware on the pinball machine can be combined in one command: ./Xtreme-Firmware/fbt COMPACT=1 DEBUG=0 flash_usb_full
When this command is executed for the first time, fbt first loads the toolchain, consisting of the GNU compiler for ARM and associated tools and libraries, and stores it under ./Xtreme-Firmware/toolchain. In addition, several submodules, including the FreeRTOS kernel, are automatically obtained from Github. Now the entire firmware is generated as a “self-update package” with all resources, i.e. including all apps, and stored in the directory ./Xtreme-Firmware/dist/f7-C/. Several files are generated, whereby the file firmware.dfu is the actual firmware and the file resources.tar contains the apps and other resources. If fbt finds a connected pinball machine, it will be updated automatically. If you only want to create the update package without installing it, the updater_package option must be used instead of flash_usb_full.
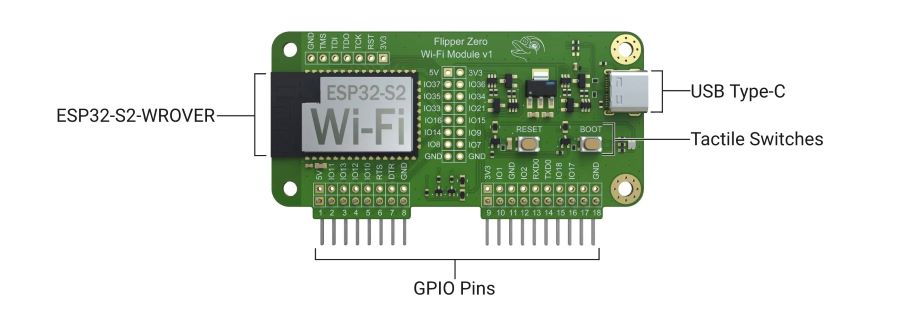
Probably the best-known hardware extension for the Flipper Zero is the WiFi Devboard. It offers a system-on-a-chip (SoC) platform based on the ESP32-S2 chipset from the manufacturer Espressiv, which offers 2.4 GHz WiFi connectivity and contains its own CPU.

The Wifi Devboard uses its own firmware and can be controlled via apps on the pinball machine. The board is connected to the Flipper Zero via the GPIO PINs.
The standard firmware of the WiFi Devboard contains Black Magic Debug, which enables debugging of the Flipper Zero firmware based on the GNU Debugger (GDB). The WiFi Devboard acts as a GDB server and can be accessed via WiFi or USB interface. With the standard firmware, no functionalities for WiFi network analysis or penetration testing are available.
Standard firmware
The standard firmware of the WiFi devboard is very easy to update with the micro Flipper Build Tool (uFBT) Python module. It is installed as follows: python -m pip install --upgrade ufbt
Now connect the board via USB. Then press and hold the BOOT button on the board and then press the RESET button, then release the BOOT button. The devboard now appears as a device under /dev/ttyACM0. Update the firmware with the following command: python3 -m ufbt devboard_flash
Then press the RESET button, disconnect and reconnect the USB connection and the devboard will appear as a serial device and is ready.
Alternative firmware
If you want to use the WiFi devboard for offensive purposes, you need the appropriate firmware. The best known are Marauder, which contains various offensive and defensive WiFi tools, and Evil Portal, which implements an access point with a captive portal for collecting access data. Both repositories contain pre-compiled .bin files, which can be installed with the Marauder Flasher (automatically) or with the web-based tool https://esp.huhn.me/. The Xtreme firmware also offers the option of installing the Marauder or Evil Portal firmware on the WiFi devboard directly from the pinball machine using an app, but this did not work properly in our tests. The Flipper Zero itself requires apps to interact with the WiFi Devboard, which are already included in the Xtreme firmware.
Note: The latest versions of Marauder now also include an Evil Portal function, but this seems to require an SD card connected directly to the ESP32 and therefore does not work with the WiFi Devboard.
If you want to make adjustments to the firmware of the WiFi devboard, you must then compile the source code and install the firmware created in this way on the devboard. The following sections show how this is done using the Marauder firmware as an example.
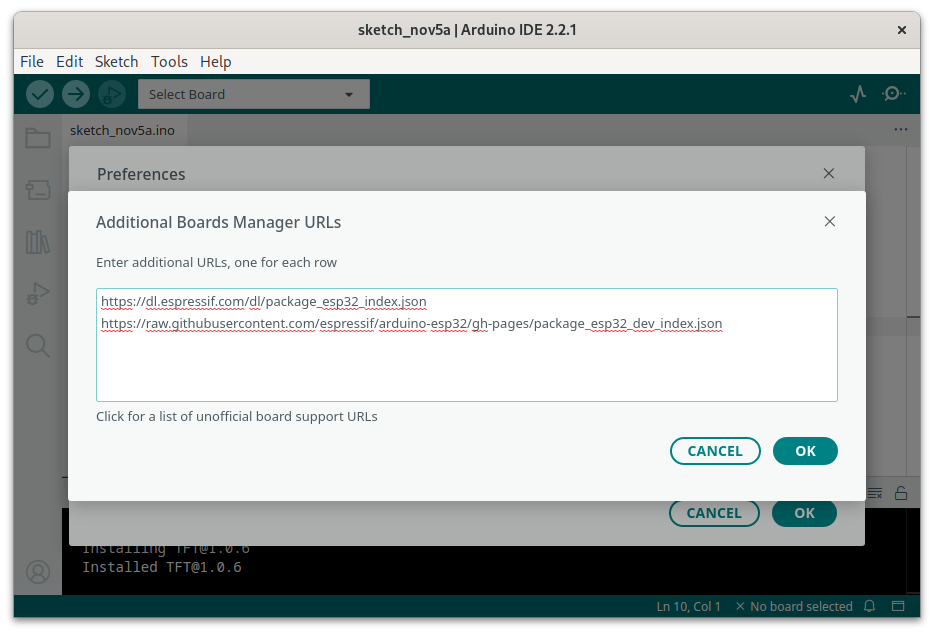
File > Preferences:
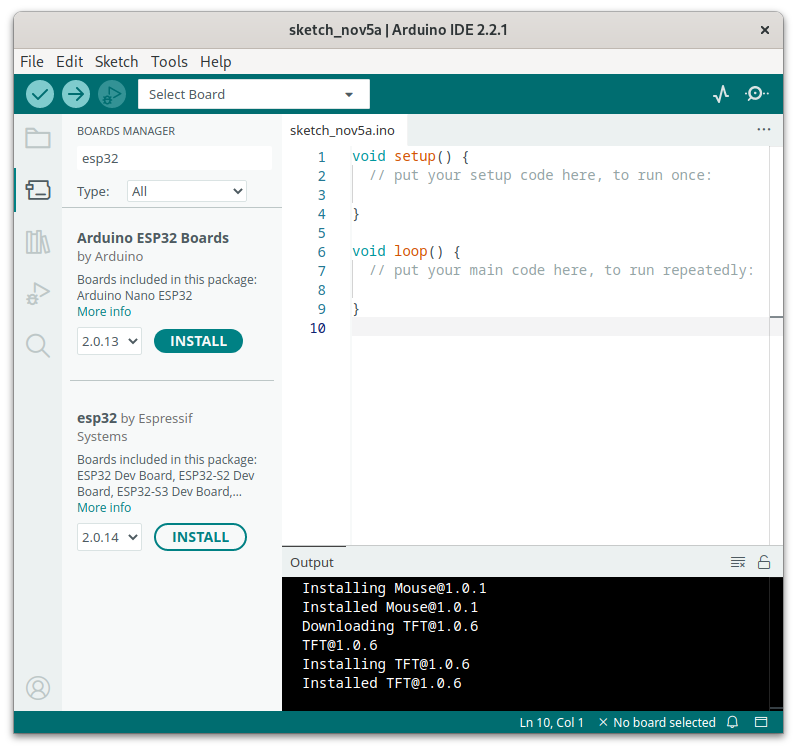
Tools > Board > Boards Manager. Now select version 2.0.14 from the search result “esp32 by Espressif Systems” and click on the INSTALL button.
~/.arduino15/packages/esp32/hardware/esp32/2.0.14/platform.txt in an editor.-w flag to all the following settings:build.extra_flags.esp32build.extra_flags.esp32s2build.extra_flags.esp32s3build.extra_flags.esp32c3-zmuldefs to all the following settings:compiler.c.elf.libs.esp32compiler.c.elf.libs.esp32s2compiler.c.elf.libs.esp32s3compiler.c.elf.libs.esp32c3Sketch > Include Library > Add .ZIP Library.... The Arduino IDE can then automatically update these libraries and displays a message when an update is available.unzip ESP32FS-1.1.zip -d ~/Arduino/tools The result should then look like this: ~/Arduino/tools/ESP32FS/tool/esp32fs.jargit clone https://github.com/justcallmekoko/ESP32Marauder.gitFinally, the file esp32_marauder.ino can be opened in the Arduino IDE, which opens the entire source code in the IDE. Now select the file configs.h and remove the comment character from the line //#define MARAUDER_FLIPPER in the BOARD TARGETS section (approx. line 19). All other lines in this section should be commented out. The source code can now be edited.
Compilation is carried out with the menu command Sketch > Verify/Compile. If the error ModuleNotFoundError: No module named 'serial' occurs, the Python module pyserial must be installed.
Menu Tools > Port, it should be displayed as /dev/ttyACM0 (ESP32S2 Dev Module).Tools > Board > esp32 select the entry ESP32S3 Dev Module.Tools > Partition Scheme select the entry Minimal SPIFFS (1.9 MB App with OTA/190KB SPIFFS).Sketch menu, select the Upload command, which writes the firmware to the devboard. If the error message A fatal error occurred: Could not open /dev/ttyACM0, the port doesn't exist appears, the authorizations of the port /dev/ttyACM0 should be checked and adjusted if necessary. Then restart the devboard using the RESET button and the new firmware will be executed.Compiling and installing firmware for the Flipper Zero and for the WiFi Devboard yourself is perfectly feasible. The official firmware for the pinball machine contains an easy-to-use tool that makes compilation and installation very simple. On the other hand, the initial setup of a development environment for the WiFi Devboard is relatively complicated and requires various libraries to be installed manually. Once this has been mastered and all the necessary tools have been installed, future compilations and installations are quite simple.
Our experts will get in contact with you!

Tomaso Vasella

Tomaso Vasella

Tomaso Vasella

Tomaso Vasella
Our experts will get in contact with you!